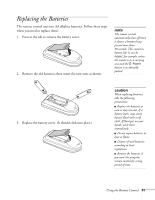
Epson 410W User's Guide - Page 49
Zooming Your Image, Changing the Image’s Aspect Ratio, video images only
 |
UPC - 010343873407
View all Epson 410W manuals
Add to My Manuals
Save this manual to your list of manuals |
Page 49 highlights
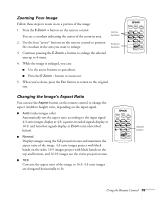
Zooming Your Image Follow these steps to zoom in on a portion of the image: 1. Press the E-Zoom + button on the remote control. You see a crosshair indicating the center of the zoom-in area. Arrow buttons 2. Use the four "arrow" buttons on the remote control to position E-Zoom the crosshair in the area you want to enlarge. buttons 3. Continue pressing the E-Zoom + button to enlarge the selected area up to 4 times. 4. While the image is enlarged, you can: ■ Use the arrow buttons to pan about. ■ Press the E-Zoom - button to zoom out. 5. When you're done, press the ESC button to return to the original size. Changing the Image's Aspect Ratio You can use the Aspect button on the remote control to change the aspect (width to height) ratio, depending on the input signal. ■ Auto (video images only) Automatically sets the aspect ratio according to the input signal. 4:3 ratio images display at 4:3, squeeze-recorded signals display at 16:9, and letterbox signals display at Zoom ratio (described below). ■ Normal Displays images using the full projection area and maintains the aspect ratio of the image. 4:3 ratio images project with black bands on the sides, 16:9 images project with black bands on the top and bottom, and 16:10 images use the entire projection area. ■ 16:9 Converts the aspect ratio of the image to 16:9. 4:3 ratio images are elongated horizontally to fit. Aspect button Using the Remote Control 49
-
 1
1 -
2
-
3
-
4
-
5
-
6
-
7
-
8
-
9
-
10
-
11
-
12
-
13
-
14
-
15
-
16
-
17
-
18
-
19
-
20
-
21
-
22
-
23
-
24
-
25
-
26
-
27
-
28
-
29
-
30
-
31
-
32
-
33
-
34
-
35
-
36
-
37
-
38
-
39
-
40
-
41
-
42
-
43
-
 44
44 -
 45
45 -
 46
46 -
 47
47 -
 48
48 -
 49
49 -
 50
50 -
 51
51 -
 52
52 -
 53
53 -
 54
54 -
55
-
56
-
57
-
58
-
59
-
60
-
61
-
62
-
63
-
64
-
65
-
66
-
67
-
68
-
69
-
70
-
71
-
72
-
73
-
74
-
75
-
76
-
77
-
78
-
79
-
80
-
81
-
82
-
83
-
84
-
85
-
86
-
87
-
88
-
89
-
90
-
91
-
92
-
93
-
94
-
95
-
96
-
97
-
98
-
99
-
100
-
101
-
102
-
103
-
104
-
105
-
106
-
107
-
108
-
109
-
110
-
111
-
112
-
113
-
114
-
115
-
116
-
117
-
118
 |
 |