Epson Artisan 700 Basics Guide - Page 16
Then press, Your printed
 |
View all Epson Artisan 700 manuals
Add to My Manuals
Save this manual to your list of manuals |
Page 16 highlights
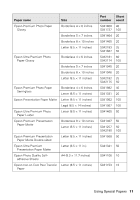
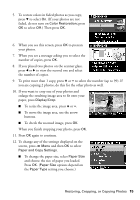
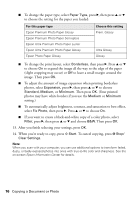
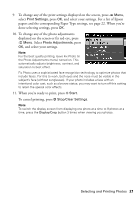
■ To change the paper type, select Paper Type, press r, then press u or d to choose the setting for the paper you loaded: For this paper type Epson Premium Photo Paper Glossy Epson Premium Photo Paper Semi-gloss Epson Ultra Premium Photo Paper Luster Epson Ultra Premium Photo Paper Glossy Epson Photo Paper Glossy Choose this setting Prem. Glossy Ultra Glossy Glossy ■ To change the print layout, select Borderless, then press r. Press u or d to choose On to expand the image all the way to the edge of the paper (slight cropping may occur) or Off to leave a small margin around the image. Then press OK. ■ To adjust the amount of image expansion when printing borderless photos, select Expansion, press r, then press u or d to choose Standard, Medium, or Minimum. Then press OK. (Your printed photos may have white borders if you use the Medium or Minimum setting.) ■ To automatically adjust brightness, contrast, and saturation to best effect, select Fix Photo, then press r. Press u or d to choose On. ■ If you want to create a black-and-white copy of a color photo, select Filter, press r, then press u or d and choose B&W. Then press OK. 13. After you finish selecting your settings, press OK. 14. When you're ready to copy, press x Start. To cancel copying, press y Stop/ Clear Settings. Note: When you scan with your computer, you can use additional options to transform faded, dusty, or badly exposed photos into ones with true-to-life color and sharpness. See the on-screen Epson Information Center for details. 16 Copying a Document or Photo
-
 1
1 -
2
-
3
-
4
-
5
-
6
-
7
-
8
-
9
-
10
-
 11
11 -
 12
12 -
 13
13 -
 14
14 -
 15
15 -
 16
16 -
 17
17 -
 18
18 -
 19
19 -
 20
20 -
 21
21 -
22
-
23
-
24
-
25
-
26
-
27
-
28
-
29
-
30
-
31
-
32
-
33
-
34
-
35
-
36
-
37
-
38
-
39
-
40
-
41
-
42
-
43
-
44
-
45
-
46
-
47
-
48
-
49
-
50
-
51
-
52
-
53
-
54
-
55
-
56
-
57
-
58
-
59
-
60
-
61
-
62
-
63
-
64
 |
 |