Epson Artisan 700 Basics Guide - Page 25
Epson Information Center, Select the following settings see the on-screen - setup
 |
View all Epson Artisan 700 manuals
Add to My Manuals
Save this manual to your list of manuals |
Page 25 highlights
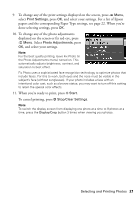
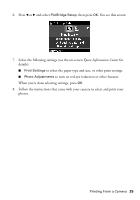
6. Press l or r and select PictBridge Setup, then press OK. You see this screen: 7. Select the following settings (see the on-screen Epson Information Center for details): ■ Print Settings to select the paper type and size, or other print settings. ■ Photo Adjustments to turn on red-eye reduction or other features. When you're done selecting settings, press OK. 8. Follow the instructions that came with your camera to select and print your photos. Printing From a Camera 25
-
 1
1 -
2
-
3
-
4
-
5
-
6
-
7
-
8
-
9
-
10
-
11
-
12
-
13
-
14
-
15
-
16
-
17
-
18
-
19
-
 20
20 -
 21
21 -
 22
22 -
 23
23 -
 24
24 -
 25
25 -
 26
26 -
 27
27 -
 28
28 -
 29
29 -
 30
30 -
31
-
32
-
33
-
34
-
35
-
36
-
37
-
38
-
39
-
40
-
41
-
42
-
43
-
44
-
45
-
46
-
47
-
48
-
49
-
50
-
51
-
52
-
53
-
54
-
55
-
56
-
57
-
58
-
59
-
60
-
61
-
62
-
63
-
64
 |
 |

Printing From a Camera
25
6.
Press
l
or
r
and select
PictBridge Setup
, then press
OK
. You see this screen:
7.
Select the following settings (see the on-screen
Epson Information Center
for
details):
■
Print Settings
to select the paper type and size, or other print settings.
■
Photo Adjustments
to turn on red-eye reduction or other features.
When you’re done selecting settings, press
OK
.
8.
Follow the instructions that came with your camera to select and print your
photos.