Epson BrightLink 436Wi User Manual - Page 117
Easy Interactive Tools, Manual Adj. Pen Area, Enter, Parent topic
 |
View all Epson BrightLink 436Wi manuals
Add to My Manuals
Save this manual to your list of manuals |
Page 117 highlights
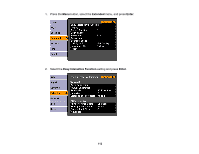
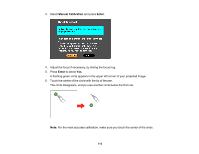
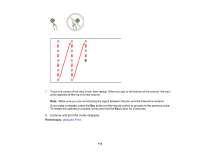
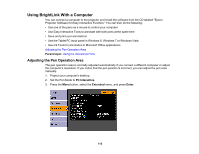
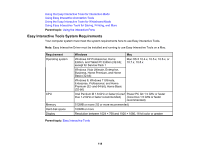
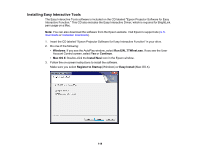
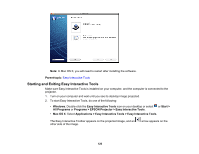
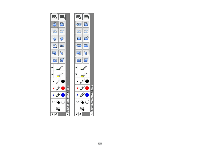
6. Select Manual Adj. Pen Area and press Enter. 7. Press Enter to select Yes. The mouse pointer moves toward the top left corner. 8. When the mouse pointer stops at the top left corner of the image, touch the tip of the pointer with the pen. The mouse pointer moves toward the bottom right corner. 9. When the mouse pointer stops at the bottom right corner of the image, touch the tip of the pointer with the pen. Parent topic: Using BrightLink With a Computer Easy Interactive Tools Your projector came with a CD containing the Easy Interactive Tools software for use with a computer. Easy Interactive Tools lets you use your interactive pen as a mouse to navigate, select, scroll, draw, save, and interact with projected content from your computer. These two modes are available: • Interactive (Annotation) mode displays the toolbar on the projected image and lets you use the pen as a mouse to open applications, access links, and operate scroll bars, for example (using one pen at a time). You can also annotate whatever is displayed from your computer (using both pens at the same time). • Whiteboard mode lets you project on one of 3 solid colors or 6 background patterns, and use the toolbar to write or draw on the background. You can also import images from your computer or a document camera. In whiteboard mode, two people can use the pens at the same time. Easy Interactive Tools System Requirements Installing Easy Interactive Tools Starting and Exiting Easy Interactive Tools 117
-
 1
1 -
2
-
3
-
4
-
5
-
6
-
7
-
8
-
9
-
10
-
11
-
12
-
13
-
14
-
15
-
16
-
17
-
18
-
19
-
20
-
21
-
22
-
23
-
24
-
25
-
26
-
27
-
28
-
29
-
30
-
31
-
32
-
33
-
34
-
35
-
36
-
37
-
38
-
39
-
40
-
41
-
42
-
43
-
44
-
45
-
46
-
47
-
48
-
49
-
50
-
51
-
52
-
53
-
54
-
55
-
56
-
57
-
58
-
59
-
60
-
61
-
62
-
63
-
64
-
65
-
66
-
67
-
68
-
69
-
70
-
71
-
72
-
73
-
74
-
75
-
76
-
77
-
78
-
79
-
80
-
81
-
82
-
83
-
84
-
85
-
86
-
87
-
88
-
89
-
90
-
91
-
92
-
93
-
94
-
95
-
96
-
97
-
98
-
99
-
100
-
101
-
102
-
103
-
104
-
105
-
106
-
107
-
108
-
109
-
110
-
111
-
 112
112 -
 113
113 -
 114
114 -
 115
115 -
 116
116 -
 117
117 -
 118
118 -
 119
119 -
 120
120 -
 121
121 -
 122
122 -
123
-
124
-
125
-
126
-
127
-
128
-
129
-
130
-
131
-
132
-
133
-
134
-
135
-
136
-
137
-
138
-
139
-
140
-
141
-
142
-
143
-
144
-
145
-
146
-
147
-
148
-
149
-
150
-
151
-
152
-
153
-
154
-
155
-
156
-
157
-
158
-
159
-
160
-
161
-
162
-
163
-
164
-
165
-
166
-
167
-
168
-
169
-
170
-
171
-
172
-
173
-
174
-
175
-
176
-
177
-
178
-
179
-
180
-
181
-
182
-
183
-
184
-
185
-
186
-
187
-
188
-
189
-
190
-
191
-
192
-
193
-
194
-
195
-
196
-
197
-
198
-
199
-
200
-
201
-
202
-
203
-
204
-
205
-
206
-
207
-
208
-
209
-
210
-
211
-
212
-
213
-
214
-
215
-
216
-
217
-
218
-
219
-
220
-
221
-
222
-
223
-
224
-
225
-
226
-
227
-
228
-
229
-
230
-
231
-
232
-
233
-
234
-
235
-
236
-
237
-
238
-
239
-
240
-
241
-
242
-
243
-
244
-
245
-
246
-
247
-
248
-
249
-
250
-
251
-
252
-
253
-
254
-
255
-
256
-
257
-
258
-
259
-
260
 |
 |
