Epson BrightLink 436Wi User Manual - Page 142
Using PC Free Annotation, Built-in Tools for Use Without a Computer, Parent topic, Computer
 |
View all Epson BrightLink 436Wi manuals
Add to My Manuals
Save this manual to your list of manuals |
Page 142 highlights
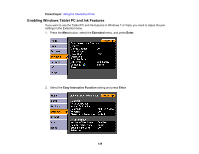
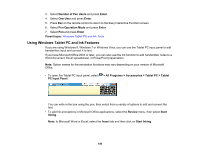
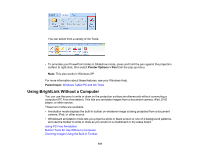
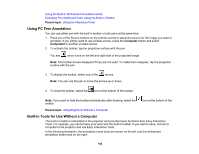
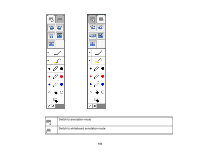
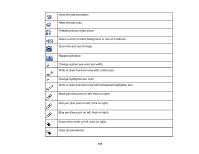
Using the Built-in Whiteboard Annotation Mode Changing Pen Width and Color Using the Built-in Toolbar Parent topic: Using the Interactive Pens Using PC Free Annotation You can use either pen with the built-in toolbar or both pens at the same time. 1. Press one of the Source buttons on the remote control to select the source for the image you want to annotate. If you simply want to use a blank screen, press the Computer button and select Computer2 or another unused source. 2. To activate the toolbar, tap the projection surface with the pen. You see arrow icons on the left and right side of the projected image. Note: The toolbar arrows disappear if they are not used. To make them reappear, tap the projection surface with the pen. 3. To display the toolbar, select one of the arrows. Note: You can use the pen to move the arrows up or down. 4. To close the toolbar, select the icon at the bottom of the toolbar. Note: If you want to hide the toolbar automatically after drawing, select the toolbar. icon at the bottom of the Parent topic: Using BrightLink Without a Computer Built-in Tools for Use Without a Computer The built-in toolbar is embedded in the projector and provides fewer functions than Easy Interactive Tools. For example, you cannot save your work with the built-in toolbar. If you want to save, connect a computer to the projector and use Easy Interactive Tools. In the following illustration, the annotation mode tools are shown on the left, and the whiteboard annotation mode tools on the right: 142
-
 1
1 -
2
-
3
-
4
-
5
-
6
-
7
-
8
-
9
-
10
-
11
-
12
-
13
-
14
-
15
-
16
-
17
-
18
-
19
-
20
-
21
-
22
-
23
-
24
-
25
-
26
-
27
-
28
-
29
-
30
-
31
-
32
-
33
-
34
-
35
-
36
-
37
-
38
-
39
-
40
-
41
-
42
-
43
-
44
-
45
-
46
-
47
-
48
-
49
-
50
-
51
-
52
-
53
-
54
-
55
-
56
-
57
-
58
-
59
-
60
-
61
-
62
-
63
-
64
-
65
-
66
-
67
-
68
-
69
-
70
-
71
-
72
-
73
-
74
-
75
-
76
-
77
-
78
-
79
-
80
-
81
-
82
-
83
-
84
-
85
-
86
-
87
-
88
-
89
-
90
-
91
-
92
-
93
-
94
-
95
-
96
-
97
-
98
-
99
-
100
-
101
-
102
-
103
-
104
-
105
-
106
-
107
-
108
-
109
-
110
-
111
-
112
-
113
-
114
-
115
-
116
-
117
-
118
-
119
-
120
-
121
-
122
-
123
-
124
-
125
-
126
-
127
-
128
-
129
-
130
-
131
-
132
-
133
-
134
-
135
-
136
-
 137
137 -
 138
138 -
 139
139 -
 140
140 -
 141
141 -
 142
142 -
 143
143 -
 144
144 -
 145
145 -
 146
146 -
 147
147 -
148
-
149
-
150
-
151
-
152
-
153
-
154
-
155
-
156
-
157
-
158
-
159
-
160
-
161
-
162
-
163
-
164
-
165
-
166
-
167
-
168
-
169
-
170
-
171
-
172
-
173
-
174
-
175
-
176
-
177
-
178
-
179
-
180
-
181
-
182
-
183
-
184
-
185
-
186
-
187
-
188
-
189
-
190
-
191
-
192
-
193
-
194
-
195
-
196
-
197
-
198
-
199
-
200
-
201
-
202
-
203
-
204
-
205
-
206
-
207
-
208
-
209
-
210
-
211
-
212
-
213
-
214
-
215
-
216
-
217
-
218
-
219
-
220
-
221
-
222
-
223
-
224
-
225
-
226
-
227
-
228
-
229
-
230
-
231
-
232
-
233
-
234
-
235
-
236
-
237
-
238
-
239
-
240
-
241
-
242
-
243
-
244
-
245
-
246
-
247
-
248
-
249
-
250
-
251
-
252
-
253
-
254
-
255
-
256
-
257
-
258
-
259
-
260
 |
 |