Epson Stylus COLOR 850N User Manual - Epson Stylus RIP Mac & PC - Page 44
Checking the Printer, Installing the EPSON Stylus RIP Software
 |
View all Epson Stylus COLOR 850N manuals
Add to My Manuals
Save this manual to your list of manuals |
Page 44 highlights
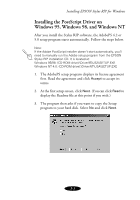
Installing EPSON Stylus RIP for Windows Checking the Printer Before you install the EPSON Stylus RIP software, follow the instructions in your printer's setup guide to set up your printer for use, making sure you perform the following steps: Load paper, install ink cartridges, and allow your printer to complete its entire ink charging cycle. Connect the printer to your computer via a parallel cable and your computer's LPT1 port. Install the standard non-PostScript EPSON driver and utilities that came with your printer. Send a sample print job with the standard driver to make sure the interface connection and cable are secure and software is installed correctly. Once the printer is set up and tested fully, you're ready to install the EPSON Stylus RIP software on your system. Installing the EPSON Stylus RIP Software Before you start, make sure Windows is running and all applications on your system are closed. Turn off all virus protection and disk-monitoring software, following the instructions included with your utility software or your Windows documentation. Note: The installation options you choose in the setup program to install EPSON Stylus RIP on a client computer will be different than the ones you choose for a standalone or server computer. 3-2
-
 1
1 -
2
-
3
-
4
-
5
-
6
-
7
-
8
-
9
-
10
-
11
-
12
-
13
-
14
-
15
-
16
-
17
-
18
-
19
-
20
-
21
-
22
-
23
-
24
-
25
-
26
-
27
-
28
-
29
-
30
-
31
-
32
-
33
-
34
-
35
-
36
-
37
-
38
-
 39
39 -
 40
40 -
 41
41 -
 42
42 -
 43
43 -
 44
44 -
 45
45 -
 46
46 -
 47
47 -
 48
48 -
 49
49 -
50
-
51
-
52
-
53
-
54
-
55
-
56
-
57
-
58
-
59
-
60
-
61
-
62
-
63
-
64
-
65
-
66
-
67
-
68
-
69
-
70
-
71
-
72
-
73
-
74
-
75
-
76
-
77
-
78
-
79
 |
 |