Epson Stylus COLOR 850N User Manual - Epson Stylus RIP Mac & PC - Page 68
Starting EPSON Stylus RIP Automatically, Temp Directory, Raster Spool Mode, My Computer
 |
View all Epson Stylus COLOR 850N manuals
Add to My Manuals
Save this manual to your list of manuals |
Page 68 highlights
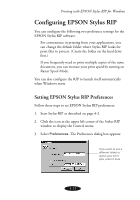
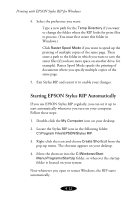
Printing with EPSON Stylus RIP for Windows 4. Select the preference you want: Type a new path for the Temp Directory if you want to change the folder where the RIP looks for print files to process. (You must first create this folder in Windows.) Click Raster Spool Mode if you want to speed up the printing of multiple copies of the same page. Then enter a path to the folder in which you want to save the raster files (if you have more space on another drive, for example). Raster Spool Mode speeds the printing of documents where you specify multiple copies of the same page. 5. Exit Stylus RIP and restart it to enable your changes. Starting EPSON Stylus RIP Automatically If you use EPSON Stylus RIP regularly, you can set it up to start automatically whenever you turn on your computer. Follow these steps: 1. Double-click the My Computer icon on your desktop. 2. Locate the Stylus RIP icon in the following folder: C:\Program Files\EPSON\Stylus RIP. 3. Right-click the icon and choose Create Shortcut from the pop-up menu. The shortcut appears on your desktop. 4. Move the shortcut into the C:\Windows\Start Menu\Programs\StartUp folder, or wherever the startup folder is located on your system. Now whenever you open or restart Windows, the RIP starts automatically. 4-12
-
 1
1 -
2
-
3
-
4
-
5
-
6
-
7
-
8
-
9
-
10
-
11
-
12
-
13
-
14
-
15
-
16
-
17
-
18
-
19
-
20
-
21
-
22
-
23
-
24
-
25
-
26
-
27
-
28
-
29
-
30
-
31
-
32
-
33
-
34
-
35
-
36
-
37
-
38
-
39
-
40
-
41
-
42
-
43
-
44
-
45
-
46
-
47
-
48
-
49
-
50
-
51
-
52
-
53
-
54
-
55
-
56
-
57
-
58
-
59
-
60
-
61
-
62
-
 63
63 -
 64
64 -
 65
65 -
 66
66 -
 67
67 -
 68
68 -
 69
69 -
 70
70 -
 71
71 -
 72
72 -
 73
73 -
74
-
75
-
76
-
77
-
78
-
79
 |
 |
