Fluke 1586A/2HC Product Manual - Page 36
Warm-Up the Product, Con the Product
 |
View all Fluke 1586A/2HC manuals
Add to My Manuals
Save this manual to your list of manuals |
Page 36 highlights
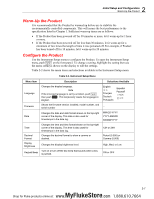
2 Initial Setup and Configuration Warm-Up the Product Warm-Up the Product It is recommended that the Product be warmed up before use to stabilize the environmentally controlled components. This will ensure the best performance to the specification listed in Chapter 1. Sufficient warm-up times are as follows: • If the Product has been powered off for 30 minutes or more, let it warm-up for 1 hour or more. • If the Product has been powered off for less than 30 minutes, let it warm-up for a minimum of two times the length of time it was powered off. For example, if Product has been turned off for 10 minutes, let it warm-up for 20 minutes. Configure the Product Use the Instrument Setup menu to configure the Product. To open the Instrument Setup menu, push on the front panel. To change a setting, highlight the setting then use the menu softkeys shown on the display to edit the settings. Table 2-2 shows the menu items and selections available in the Instrument Setup menu. Table 2-2. Instrument Setup Menu Menu Item Description Language Firmware Changes the display language. Note If the incorrect language is set by accident, push then push . This temporarily resets the language to English. Shows the firmware version installed, model number, and serial number Date Changes the date and date format shown on the top-right corner of the display. This date is also used for timestamps in the data log. Time Decimal Format Display Brightness Keypad Beep Changes the time and time format shown on the top-right corner of the display. This time is also used for timestamps in the data log. Changes the decimal format to show a comma or decimal. Changes the display brightness level. Turn on or turn off the key beep that sounds when a key is pushed. Selections Available English 中文 Français Deutsch Portugués Español 한국어 -- MM-DD-YYYY YYYY-MM-DD DD/MM/YYYY 12H or 24H Period (0.000) or Comma (0,000) High, Med, or Low ON or OFF 2-7 MyFlukeStore Shop for Fluke products online at: www. .com 1.888.610.7664
-
 1
1 -
2
-
3
-
4
-
5
-
6
-
7
-
8
-
9
-
10
-
11
-
12
-
13
-
14
-
15
-
16
-
17
-
18
-
19
-
20
-
21
-
22
-
23
-
24
-
25
-
26
-
27
-
28
-
29
-
30
-
 31
31 -
 32
32 -
 33
33 -
 34
34 -
 35
35 -
 36
36 -
 37
37 -
 38
38 -
 39
39 -
 40
40 -
 41
41 -
42
-
43
-
44
-
45
-
46
-
47
-
48
-
49
-
50
-
51
-
52
-
53
-
54
-
55
-
56
-
57
-
58
-
59
-
60
-
61
-
62
-
63
-
64
-
65
-
66
-
67
-
68
-
69
-
70
-
71
-
72
-
73
-
74
-
75
-
76
-
77
-
78
-
79
-
80
-
81
-
82
-
83
-
84
-
85
-
86
-
87
-
88
-
89
-
90
-
91
-
92
-
93
-
94
-
95
-
96
-
97
-
98
-
99
-
100
-
101
-
102
-
103
-
104
-
105
-
106
-
107
-
108
-
109
-
110
-
111
-
112
-
113
-
114
-
115
-
116
-
117
-
118
-
119
-
120
-
121
-
122
-
123
-
124
-
125
-
126
-
127
-
128
-
129
-
130
-
131
-
132
-
133
-
134
-
135
 |
 |
