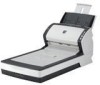
Fujitsu 6240 Operating Guide - Page 44
Cropping, Brightness, Contrast, Layout] Tab, Orientation, Detect Length
 |
UPC - 097564307270
View all Fujitsu 6240 manuals
Add to My Manuals
Save this manual to your list of manuals |
Page 44 highlights
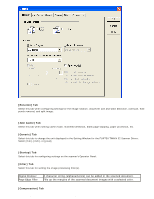
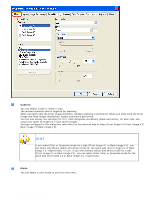
2.5 How to Use the Scanner Drivers Cropping Select how to crop scanned document images to output. Fixed Detect Length Automatic Scanned document images are output in a specified size. The rear end of a scanned document is detected and scanning is performed for the original length. When shorter sheets are included in a batch of documents to scan, output images are adjusted to their original size. The page size of the scanned documents is automatically detected and the images are output in the detected page size. The skew of documents is also automatically detected and corrected to output correct images. Brightness You can set the brightness of the entire image. Specify a number from 1 (darkest) to 255 (brightest) as the brightness value. The higher the value, the brighter the image. The lower the value, the darker the image. Contrast You can set the contrast of the scanned image. Specify a number from 1 (low [soft]) to 100 (high [sharp]) to increase brightness for the entire image. Select a higher value to emphasize the difference in brightness between the light and dark areas of the image. [Layout] Tab Page Orientation file:///D|/Documents%20and%20Settings/scanner/Desktop/Lynx3/06/contents/EN/02/c02_05_01.htm (8 of 18)9/28/2007 2:38:14 PM
-
 1
1 -
2
-
3
-
4
-
5
-
6
-
7
-
8
-
9
-
10
-
11
-
12
-
13
-
14
-
15
-
16
-
17
-
18
-
19
-
20
-
21
-
22
-
23
-
24
-
25
-
26
-
27
-
28
-
29
-
30
-
31
-
32
-
33
-
34
-
35
-
36
-
37
-
38
-
 39
39 -
 40
40 -
 41
41 -
 42
42 -
 43
43 -
 44
44 -
 45
45 -
 46
46 -
 47
47 -
 48
48 -
 49
49 -
50
-
51
-
52
-
53
-
54
-
55
-
56
-
57
-
58
-
59
-
60
-
61
-
62
-
63
-
64
-
65
-
66
-
67
-
68
-
69
-
70
-
71
-
72
-
73
-
74
-
75
-
76
-
77
-
78
-
79
-
80
-
81
-
82
-
83
-
84
-
85
-
86
-
87
-
88
-
89
-
90
-
91
-
92
-
93
-
94
-
95
-
96
-
97
-
98
-
99
-
100
-
101
-
102
-
103
-
104
-
105
-
106
-
107
-
108
-
109
-
110
-
111
-
112
-
113
-
114
-
115
-
116
-
117
-
118
-
119
-
120
-
121
-
122
-
123
-
124
-
125
-
126
-
127
-
128
-
129
-
130
-
131
-
132
-
133
-
134
-
135
-
136
-
137
-
138
-
139
-
140
-
141
-
142
-
143
-
144
-
145
-
146
-
147
-
148
-
149
-
150
-
151
-
152
-
153
-
154
-
155
-
156
-
157
-
158
-
159
-
160
-
161
-
162
-
163
-
164
-
165
-
166
-
167
-
168
-
169
-
170
-
171
-
172
-
173
-
174
-
175
-
176
-
177
-
178
-
179
-
180
-
181
-
182
-
183
-
184
-
185
-
186
-
187
-
188
-
189
-
190
-
191
-
192
-
193
-
194
-
195
-
196
-
197
-
198
-
199
-
200
-
201
-
202
-
203
-
204
-
205
-
206
-
207
-
208
-
209
-
210
-
211
-
212
-
213
-
214
-
215
-
216
-
217
-
218
-
219
-
220
-
221
-
222
-
223
-
224
-
225
-
226
-
227
-
228
-
229
-
230
-
231
-
232
-
233
-
234
-
235
-
236
-
237
-
238
-
239
-
240
-
241
 |
 |
