Gigabyte VCatch User Guide - Page 26
Display/Preview Options, TV Safe Zone/Grid Lines, Dual Preview, Preview Mode
 |
View all Gigabyte VCatch manuals
Add to My Manuals
Save this manual to your list of manuals |
Page 26 highlights
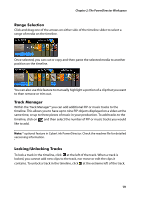
CyberLink PowerDirector Display/Preview Options CyberLink PowerDirector includes some display and preview options that help make your editing experience easier. Click on to enable the TV safe zone, display grid lines, use a dual preview, and select a preview mode. TV Safe Zone/Grid Lines When you place media on the PiP track of the timeline, use the TV safe zone and grid lines to help with the precise placement on your video's image. • Click the button and then select TV Safe Zone to enable a box that indicates the on-screen area of most TV displays. • Click the button, select Grid Lines and then select the number of lines you want to display in a grid over the video image. Use this grid to more precisely place the PiP media where you want on the video image. Once enabled, select Snap to Reference to have the selected objects snap to the grid lines, TV safe zone and the boundary of the preview window. Dual Preview If you have a secondary display device, such as a monitor, TV, or DV camcorder connected to your computer, click the button and select Dual Preview to extend your workspace and preview your project on a secondary display. Note: to use a connected monitor or TV as a secondary preview window, you must first enable extend desktop to a secondary display within the Windows Display Properties Settings. Once enabled, when you select play on the preview window, you can preview your production on both your primary and secondary display (TV or monitor), or on a connected DV camcorder, depending on your selected preference. Preview Mode CyberLink PowerDirector provides two modes you can use to preview your video production: • Real-time: synchronizes and renders clips and effects in real-time, displaying a preview of your video at the standard 25 (PAL)/30 (NTSC) frames per second. 16
-
 1
1 -
2
-
3
-
4
-
5
-
6
-
7
-
8
-
9
-
10
-
11
-
12
-
13
-
14
-
15
-
16
-
17
-
18
-
19
-
20
-
 21
21 -
 22
22 -
 23
23 -
 24
24 -
 25
25 -
 26
26 -
 27
27 -
 28
28 -
 29
29 -
 30
30 -
 31
31 -
32
-
33
-
34
-
35
-
36
-
37
-
38
-
39
-
40
-
41
-
42
-
43
-
44
-
45
-
46
-
47
-
48
-
49
-
50
-
51
-
52
-
53
-
54
-
55
-
56
-
57
-
58
-
59
-
60
-
61
-
62
-
63
-
64
-
65
-
66
-
67
-
68
-
69
-
70
-
71
-
72
-
73
-
74
-
75
-
76
-
77
-
78
-
79
-
80
-
81
-
82
-
83
-
84
-
85
-
86
-
87
-
88
-
89
-
90
-
91
-
92
-
93
-
94
-
95
-
96
-
97
-
98
-
99
-
100
-
101
-
102
-
103
-
104
-
105
-
106
-
107
-
108
-
109
-
110
-
111
-
112
-
113
-
114
-
115
-
116
-
117
-
118
-
119
-
120
-
121
-
122
-
123
-
124
-
125
-
126
-
127
-
128
 |
 |
