Gigabyte VCatch User Guide - Page 81
Mixing Audio and Adding Voice Overs, Splitting Audio from a Video Clip
 |
View all Gigabyte VCatch manuals
Add to My Manuals
Save this manual to your list of manuals |
Page 81 highlights
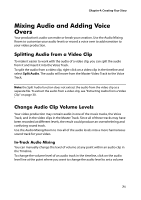
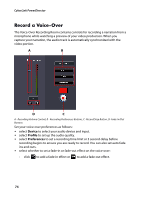
Chapter 4: Creating Your Story Mixing Audio and Adding Voice Overs Your production's audio can make or break your creation. Use the Audio Mixing Room to customize your audio levels or record a voice over to add narration to your video production. Splitting Audio from a Video Clip To make it easier to work with the audio of a video clip, you can split the audio from it and insert it into the Voice Track. To split the audio from a video clip, right-click on a video clip in the timeline and select Split Audio. The audio will move from the Master Video Track to the Voice Track. Note: the Split Audio function does not extract the audio from the video clip as a separate file. To extract the audio from a video clip, see "Extracting Audio from a Video Clip" on page 30. Change Audio Clip Volume Levels Your video production may contain audio in one of the music tracks, the Voice Track, and in the video clips in the Master Track. Since all of these tracks may have been recorded at different levels, the result could produce an overwhelming and confusing sound track. Use the Audio Mixing Room to mix all of the audio levels into a more harmonious sound track for your video. In-Track Audio Mixing You can manually change the level of volume at any point within an audio clip in the Timeline. To change the volume level of an audio track in the timeline, click on the audio level line at the point where you want to change the audio level to set a volume 71
-
 1
1 -
2
-
3
-
4
-
5
-
6
-
7
-
8
-
9
-
10
-
11
-
12
-
13
-
14
-
15
-
16
-
17
-
18
-
19
-
20
-
21
-
22
-
23
-
24
-
25
-
26
-
27
-
28
-
29
-
30
-
31
-
32
-
33
-
34
-
35
-
36
-
37
-
38
-
39
-
40
-
41
-
42
-
43
-
44
-
45
-
46
-
47
-
48
-
49
-
50
-
51
-
52
-
53
-
54
-
55
-
56
-
57
-
58
-
59
-
60
-
61
-
62
-
63
-
64
-
65
-
66
-
67
-
68
-
69
-
70
-
71
-
72
-
73
-
74
-
75
-
 76
76 -
 77
77 -
 78
78 -
 79
79 -
 80
80 -
 81
81 -
 82
82 -
 83
83 -
 84
84 -
 85
85 -
 86
86 -
87
-
88
-
89
-
90
-
91
-
92
-
93
-
94
-
95
-
96
-
97
-
98
-
99
-
100
-
101
-
102
-
103
-
104
-
105
-
106
-
107
-
108
-
109
-
110
-
111
-
112
-
113
-
114
-
115
-
116
-
117
-
118
-
119
-
120
-
121
-
122
-
123
-
124
-
125
-
126
-
127
-
128
 |
 |
