Gigabyte VCatch User Guide - Page 27
Media Viewer, Editing Workspace, Timeline View
 |
View all Gigabyte VCatch manuals
Add to My Manuals
Save this manual to your list of manuals |
Page 27 highlights
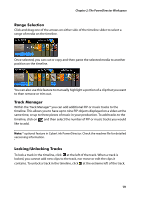
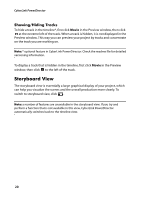
Chapter 2: The PowerDirector Workspace • Non Real-time: mutes the audio and displays a preview at a reduced speed to help make editing much more fluid. Useful when editing high-definition video, using multiple PiP tracks on a less powerful computer, or when you receive dropped frames when previewing. By muting the audio and slowing down the video, CyberLink PowerDirector lets you view more frames per second when your computer has trouble providing a smooth preview during editing. Media Viewer The Media Viewer is similar to the preview window, but provides a larger display of your production, including an option to view it at full screen. To use the Media Viewer: • click • click • click • click in the preview window to launch the Media Viewer. in the Media Viewer to view your production at full screen. in full screen mode to return the window to the normal size. in full screen mode to close the Media Viewer. Editing Workspace The editing workspace is where you create your project by adding your media, various effects, transitions, and titles. The editing workspace has two different views, the Timeline and Storyboard view, which are accessed by clicking on the or buttons. Note: you can set which workspace view is displayed by default in "Editing Preferences" on page 33. Timeline View The timeline view lets you view your entire project based on running time. This view is useful if you want to insert effects, subtitles, etc. at a specific moment in production. The timeline view also provides a view of all the tracks, media and other content (chapter markers, subtitle markers) that are displayed in the timeline. To switch to timeline view, click . 17
-
 1
1 -
2
-
3
-
4
-
5
-
6
-
7
-
8
-
9
-
10
-
11
-
12
-
13
-
14
-
15
-
16
-
17
-
18
-
19
-
20
-
21
-
 22
22 -
 23
23 -
 24
24 -
 25
25 -
 26
26 -
 27
27 -
 28
28 -
 29
29 -
 30
30 -
 31
31 -
 32
32 -
33
-
34
-
35
-
36
-
37
-
38
-
39
-
40
-
41
-
42
-
43
-
44
-
45
-
46
-
47
-
48
-
49
-
50
-
51
-
52
-
53
-
54
-
55
-
56
-
57
-
58
-
59
-
60
-
61
-
62
-
63
-
64
-
65
-
66
-
67
-
68
-
69
-
70
-
71
-
72
-
73
-
74
-
75
-
76
-
77
-
78
-
79
-
80
-
81
-
82
-
83
-
84
-
85
-
86
-
87
-
88
-
89
-
90
-
91
-
92
-
93
-
94
-
95
-
96
-
97
-
98
-
99
-
100
-
101
-
102
-
103
-
104
-
105
-
106
-
107
-
108
-
109
-
110
-
111
-
112
-
113
-
114
-
115
-
116
-
117
-
118
-
119
-
120
-
121
-
122
-
123
-
124
-
125
-
126
-
127
-
128
 |
 |
