Gigabyte VCatch User Guide - Page 93
Outputting to a Camcorder, Customizing Video Profiles
 |
View all Gigabyte VCatch manuals
Add to My Manuals
Save this manual to your list of manuals |
Page 93 highlights
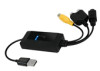
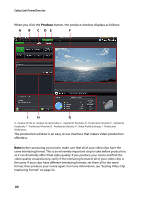
Chapter 5: Producing Your Video • Enable preview during production: select this option to preview your movie during production. Selecting this option will increase the time required to produce your file. • x.v.Color: x.v.Color is a new color system that can display a wider color range than usual. CyberLink PowerDirector can generate an x.v.Color-compliant stream, which is backward compatible with RGB displays, while offering the opportunity to achieve better visual quality if your playback environment is x.v.Color ready). • Shut down after production: select this option for if you want to shut down your computer automatically after CyberLink PowerDirector finishes producing your video. Outputting to a Camcorder Select the Camcorder option if you want to produce your movie and then write it back to a DV or an HDV tape. Note: you must manually locate the position on your HDV camcorder tape where you want to write back your content to before proceeding. You can also output your production to a file that you can then copy back to an HDD (hard disk drive) camcorder. Customizing Video Profiles After you select whether to output your file to a DV, HDV* or HDD camcorder, depending on your selection, there may be video quality settings you can customize in the video profiles section. Note: * optional feature in CyberLink PowerDirector. Check the readme file for detailed versioning information. These video quality settings are called profiles, and can consist of your video's resolution, bitrate compression, audio compression type, and more. Before you output your production, you may want to create a new quality profile, edit an existing one, or select a different existing profile and other options from one of the available drop-downs in the production options section. 83
-
 1
1 -
2
-
3
-
4
-
5
-
6
-
7
-
8
-
9
-
10
-
11
-
12
-
13
-
14
-
15
-
16
-
17
-
18
-
19
-
20
-
21
-
22
-
23
-
24
-
25
-
26
-
27
-
28
-
29
-
30
-
31
-
32
-
33
-
34
-
35
-
36
-
37
-
38
-
39
-
40
-
41
-
42
-
43
-
44
-
45
-
46
-
47
-
48
-
49
-
50
-
51
-
52
-
53
-
54
-
55
-
56
-
57
-
58
-
59
-
60
-
61
-
62
-
63
-
64
-
65
-
66
-
67
-
68
-
69
-
70
-
71
-
72
-
73
-
74
-
75
-
76
-
77
-
78
-
79
-
80
-
81
-
82
-
83
-
84
-
85
-
86
-
87
-
 88
88 -
 89
89 -
 90
90 -
 91
91 -
 92
92 -
 93
93 -
 94
94 -
 95
95 -
 96
96 -
 97
97 -
 98
98 -
99
-
100
-
101
-
102
-
103
-
104
-
105
-
106
-
107
-
108
-
109
-
110
-
111
-
112
-
113
-
114
-
115
-
116
-
117
-
118
-
119
-
120
-
121
-
122
-
123
-
124
-
125
-
126
-
127
-
128
 |
 |
