Harman Kardon AVR 745 Owners Manual - Page 12
Left/Right Buttons - avr 745 problems
 |
View all Harman Kardon AVR 745 manuals
Add to My Manuals
Save this manual to your list of manuals |
Page 12 highlights
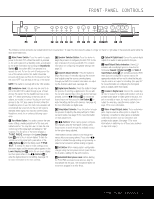
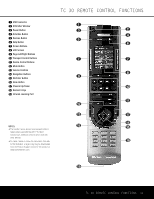
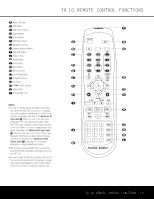
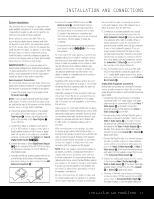
TC 30 REMOTE CONTROL FUNCTIONS 0 USB Connector: Push down on the rubber cover to access the USB connecter. To program the TC 30 from our Web site, connect the supplied USB cable here, and then to your computer. 1 IR Emitter Window: Point this end of the remote toward the devices being controlled. 2 Power Button: Press this button to turn the AVR off. Depending on the particular device being controlled, it may turn other devices on or off. When an Activity is in use, pressing this button will turn off all devices associated with the Activity. 3 Activities Button: Press this button to view the list of Activities programmed into your TC 30. Press the Screen Button 6 next to an Activity to select it and turn on the Devices in that Activity. 4 Devices Button: Press this button to display a list of all the Devices programmed in your TC 30. To control the Device, press the Screen Button 6 next to the desired Device's name. 5 Help Button: If you are having problems with an Activity, press this button for interactive help screens that will resolve issues with synchronizing the status of the components in your system. 6 Screen Buttons: Press the buttons at either side of the LCD screen to select the Activity, Device or command shown next to the button. 7 LCD Screen: The LCD screen displays system messages, help screens and the functions assigned to the Screen Buttons 6, depending on the remote's current status. 8 Page Left/Right Buttons: Press these buttons to show additional screen display pages for a Device, Activity or setup function. 9 Transport Control Buttons: Press these buttons to control the transport functions for devices such as DVD or CD players, digital recorders and VCRs when they are active. A Device Control Buttons: These buttons directly control functions of the currently active device. The names on the individual button names are the typical function, but the actual function will vary with the device. When using the TC 30 to setup and configure the AVR 745, press the "Menu" button to activate the on-screen menus. B Mute Button: Press this button to activate the MUTE function of the device being controlled. C Volume Controls: Press these buttons to change the volume of the device being controlled. D Navigation Buttons: The function of the buttons varies according to the device being controlled. E OK/Enter Button: This button is normally the "Set," "Enter" or "Select" function for the device being controlled, but its function will vary, according to the device being controlled. F Glow Button: Press this button to illuminate the LCD screen and the button backlighting. The backlighting will also come on when any button is pushed. You may change the setting for the length of time the lighting is on through the settings available when your TC 30 is connected to the Internet. The backlighting will also turn on automatically any time you move the remote, thanks to a built-in "tilt sensor." You may disable the "tilt-on" function in the Remote Options section of the TC 30 Web site. G Channel Up/Down: Press these buttons to change the device's channel or station. When controlling the AVR 745's tuner function, these buttons are used to step up or down through the list of stations in the preset memories. H Numeric Keys: These buttons enter numeric values for the device being controlled. I Infrared Learning Port: When "learning" commands from a device's remote into the TC 30, point the IR transmitter on the remote being "learned" here. 12 TC 30 REMOTE CONTROL FUNCTIONS
-
 1
1 -
2
-
3
-
4
-
5
-
6
-
 7
7 -
 8
8 -
 9
9 -
 10
10 -
 11
11 -
 12
12 -
 13
13 -
 14
14 -
 15
15 -
 16
16 -
 17
17 -
18
-
19
-
20
-
21
-
22
-
23
-
24
-
25
-
26
-
27
-
28
-
29
-
30
-
31
-
32
-
33
-
34
-
35
-
36
-
37
-
38
-
39
-
40
-
41
-
42
-
43
-
44
-
45
-
46
-
47
-
48
-
49
-
50
-
51
-
52
-
53
-
54
-
55
-
56
-
57
-
58
-
59
-
60
 |
 |
