Harman Kardon AVR 745 Owners Manual - Page 36
Delay Reset, Delay, Reset, Large, Small, Speaker Size, Ezset Settings, Back To Manual, Setup, A/v
 |
View all Harman Kardon AVR 745 manuals
Add to My Manuals
Save this manual to your list of manuals |
Page 36 highlights
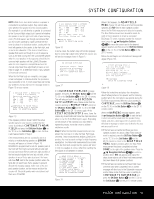
SYSTEM CONFIGURATION In addition to providing delaying adjustments for each individual speaker position, the AVR 745 allows you to adjust the delay for the combined output of all speakers as a group. This feature is called A/V Sync Delay; it allows you to compensate for delays to the video image that may be caused by the processing in products such as digital video displays, video scalers, digital cable or satellite systems, or personal video recorders. With proper adjustment of the setting for A/V Sync Delay, you can eliminate the loss of lip sync that may be caused by digital video applications. To view or change the current delay settings, make sure the EZSET/EQ MAIN menu (Figure 12) is on the screen. Press the ⁄/¤ Navigation Buttons D© to move the cursor to DELAY ADJUST and then press the OK/Enter Button E on the TC 30 or the Set Button œ on the ZR 10. The DELAY ADJUST menu (Figure 29) will appear on the screen. * DELAY ADJUST * → FL :12.0ft SBR :10.0ft CEN :12.0ft SBL :10.0ft FR :12.0ft SL :10.0ft SR :10.0ft SUB :12.0ft DELAY RESET:OFF ON UNIT: FEET METER A/V SYNC DELAY : 0mS EZSET SETTINGS: OFF ON BACK TO MANUAL SETUP Figure 29 Once the DELAY ADJUST menu is on your screen, note that the default for distance settings is in feet. If your measurements are in feet, proceed to the next step; if your measurements are made in meters, press the ¤ Navigation Buttons D© until the on-screen cursor is at the UNIT line on the menu. Then, press the ‹/› Navigation Buttons D© so that METER is highlighted. When the change in measurement units is made, press the ⁄/¤ Navigation Buttons D© to return the cursor to the FL position. If you wish to reset all delay settings to the factory defaults, as shown in Figure 29, press the ⁄/¤ Navigation Buttons D© until the cursor is pointing to the DELAY RESET line. Next, press the ‹/› Navigation Buttons D© so that ON is highlighted in reverse video. The settings will reset, and you may now continue to make any needed changes following the instructions below. Once you make the first change to the default settings, the DELAY RESET line will return to OFF, indicating that the factory defaults are no longer in effect. To change a setting, first make certain that the onscreen cursor is pointing to FL, and press the ‹/› Navigation Buttons D© until the distance from the center speaker to the preferred listening position is entered. Next, press the ‹/› Navigation Buttons D© to move the cursor to the next line and use the ‹/› Navigation Buttons D© again to enter the distance from the main listening position to the center speaker. Repeat the procedure for all active speaker positions, first using the ⁄/¤ Navigation Buttons D© to change to the next position; then use the ‹/› Navigation Buttons D© to change the setting. Note that only the speaker positions that have been set to LARGE or SMALL in the SPEAKER SIZE menu, as shown on page 34, may be adjusted. The appearance of three dashes next to a speaker position in place of a distance setting indicates that you have not configured an active speaker for that location. If you have already run EzSet/EQII, return to the settings established by the automated system by pressing the ⁄/¤ Navigation Buttons D© until the cursor is pointing to the EZSET SETTINGS line. Next, press the ‹/› Navigation Buttons D© so that ON is highlighted in reverse video. The settings will be resent to the values calculated by EzSet/EQII, and the menu will be locked so that the settings may not be changed. To go back into the menu and make any manual changes to one or more channels, you must first return the cursor to the EZSET SETTINGS line and press the ‹/› Navigation Buttons D© so that OFF is highlighted in reverse video. This will unlock the menu to allow changes. When the delay time for all speaker positions has been set, you may return to the manual setup by pressing the ⁄/¤ Navigation Buttons D© until the cursor points to BACK TO MANUAL SETUP and then pressing the OK/Enter Button E on the TC 30 or the Set Button œ. However, if you have a digital video source or a digital video display that causes lack of lip sync, you may use the A/V sync adjust feature to delay the audio signal as it is sent to all channels (as opposed to the individual settings) so that the picture and sound are brought back together. We recommend that this adjustment be made using the direct-access controls on the remote, as shown below. That enables you to see the image while making the adjustment; however, you may also adjust it here using the menu system. To adjust the A/V sync delay, press the ⁄/¤ Navigation Buttons D© so that the cursor is pointing to the A/V SYNC DELAY line in the menu and then press the ‹/› Navigation Buttons D© to delay the sound until it matches the on-screen video. The delay settings may also be adjusted directly and without going into the OSD menu system at any time using the TC 30 remote control and while viewing an on-screen image. This is particularly helpful in the case of the A/V sync delay, since it is important to be able to view the impact of the A/V sync delay adjustment with on-screen images. To adjust the delay settings, first try to have a program on the video display that has close-ups and dialogue. If you feel that the audio is ahead of the picture, look closely at the actors' lips when they stop speaking, and notice whether their lips move for a short duration after the dialogue has stopped. When using the delay adjustments, change the setting so that the movement of the actors' lips is in sync with the sound, so that the sound stops when their lips stop. This is a good way to get the image and sound locked together. The controls for A/V sync delay are activated by first pressing the Devices Button 4 on the TC 30, and then pressing the Screen Button 6 at the top of the left vertical row, to the right of the AVR image in the remote's screen. When the images in the LCD change, press the Screen Button 6 to the left of the box with the word DELAY. Within five seconds, when the A/V SYNC DELAY message appears in the Lower Display Line D, press the OK/Enter Button E and then use the ‹/› Navigation Buttons D© to bring the image and sound into sync. When you have completed the adjustments, press the OK/Enter Button E again to enter the setting into the system memory. When a 480i image is being viewed, you will see the A/V sync time message appear as a semi-OSD onscreen message, as well as in the front-panel display. Semi-OSD messages are not available when 480p or higher resolution video is in use. To change the delay setting for an individual speaker setting directly, rather than the A/V sync "group delay," follow these same instructions, but when the A/V SYNC DELAY message appears, press the ‹/› Navigation Buttons D© until the desired speaker position name appears, and then press the OK/Enter Button E to start the selection, the ‹/› Navigation Buttons D to change the delay settings, and finally the OK/Enter Button E to store the setting. Note that the A/V sync delay setting is unique to each video input source, so you may enter a different setting to compensate for the differences with any product attached to the different inputs. When all changes to the Delay settings have been made, press the ⁄/¤ Navigation Buttons D© until the cursor is on the BACK TO MANUAL SETUP menu and then press the OK/Enter Button E on the TC 30 or the Set Button œ so that you may make any other adjustments to the system parameters. If the changes just made complete the manual adjustments needed, press the Menu A or OSD Button ∫ to exit the menu system and resume normal system operation. 36 SYSTEM CONFIGURATION
-
 1
1 -
2
-
3
-
4
-
5
-
6
-
7
-
8
-
9
-
10
-
11
-
12
-
13
-
14
-
15
-
16
-
17
-
18
-
19
-
20
-
21
-
22
-
23
-
24
-
25
-
26
-
27
-
28
-
29
-
30
-
 31
31 -
 32
32 -
 33
33 -
 34
34 -
 35
35 -
 36
36 -
 37
37 -
 38
38 -
 39
39 -
 40
40 -
 41
41 -
42
-
43
-
44
-
45
-
46
-
47
-
48
-
49
-
50
-
51
-
52
-
53
-
54
-
55
-
56
-
57
-
58
-
59
-
60
 |
 |
