Harman Kardon AVR 745 Owners Manual - Page 25
Navigation Buttons, OK/Enter Button, Set Button, Navigation Button, Navigation, Button, Buttons
 |
View all Harman Kardon AVR 745 manuals
Add to My Manuals
Save this manual to your list of manuals |
Page 25 highlights
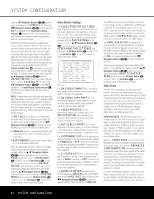
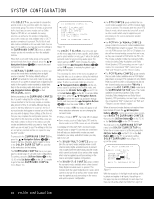
SYSTEM CONFIGURATION no "right" or "wrong" setting in many cases, and the setting that looks best to your eyes is the one that is truly correct for your specific combination of equipment, room environment and your own personal viewing preferences. Feel free to experiment with different setting combinations, as you can't "hurt" anything by doing so. When you do reach the combination of settings for both your display system and each input, it is a good idea to write those settings down using the worksheets found on pages 55 - 57. (A copy of the blank worksheets may also be found in the support section our Web site at www.harmankardon.com/support.) To reach the VIDEO MAIN menu, first make sure the MASTER MENU is on the screen, and then press the ‹/› Navigation Buttons D© until the on-screen cursor is pointing to VIDEO SETUP and then press the OK/Enter Button E on the TC 30 or the Set Button œ on the ZR 10 remote. The VIDEO MAIN menu (Figure 5) will appear on the screen. ** VIDEO MAIN ** → SOURCE :VIDEO 1 TITLE : VIDEO IN-PORT :AUTO VIDEO PROCESS :FAROUDJA SOURCE TYPE :VCR DISPLAY TYPE :CRT ENHANCE LEVEL :32 PICT ADJUST :ORIGINAL ADVANCED CONFIG SET BACK TO MASTER MENU Figure 5 Once the first VIDEO MAIN menu is displayed with the on-screen cursor pointing to SOURCE, press the ‹/› Navigation Buttons D© until the name of the input you wish to change the settings for is shown. At the same time, any video input name previously changed to individualize the source setting will be shown on the TITLE line. To change the title, go back to the IN/OUT SETUP menu. Once the source to be adjusted has been selected, press the ⁄/¤ Navigation Buttons D© until the on-screen cursor is pointing to SOURCE TYPE as the two lines below the TITLE line are informational only, and their setting may not be adjusted in this menu. • The VIDEO IN-PORT line shows the video input jacks used for this input. If AUTO has been selected, the display will alternate between AUTO and the actual active input. • The VIDEO PROCESS line shows whether the system is in the Bypass, Video Conversion or Faroudja video processing mode. Note that the FAROUDJA setting must be enabled for the input being adjusted through the IN/OUT MENU in order for the settings available on this menu and the ADVANCED CONFIGURATION menus to be active. Once an input is selected, the first configuration choice is to tell the AVR 745 what type of device is being used for that source. To change this setting from the system default, press the ¤ Navigation Button D© so that the on-screen cursor is pointing to SOURCE TYPE and then press the ‹/› Navigation Buttons D© to select, from among the options shown, one that is closest to the type of product connected to that input. The selection made will change the settings on the ADVANCED CONFIGURATION SUB-MENUS to those best suited to that type of device. Of course, you may also change these settings yourself at any time through the submenus. The list of input source defaults is: DVD: This setting is optimized for use with the output signal of a typical DVD player. VCR: This setting is optimized for use with the output signal of an analog videocassette recorder. CABLE DIG: This setting is optimized for use with digital cable set-top boxes. However, it is important to note that even when a digital cable system is in use, there may be a mix of digital and analog channels. We recommend that you start with this setting and then change the options in the ADVANCED CONFIGURATION menus as needed, to tailor the output to your preferences. SAT DIG: This setting is optimized for use with digital satellite-system set-top boxes. CABLE ANA: This setting is optimized for use with analog cable set-top boxes. SAT ANA: This setting is optimized for use with analog satellite-system set-top boxes. CAMERA ANA: This setting is optimized for use with analog VCRs and camcorders. CAMERA DIG: This setting is optimized for use with digital camcorders or still-image cameras. The DISPLAY TYPE line is a global, rather than input-dependent setting, as there is only one display connected to the AVR. The settings here are primarily changes to the video enhancement level and aspect ratio for a specific type of device, and defaults were selected after testing on a wide range of brands. To change this setting, press the ¤ Navigation Button D© so that the onscreen cursor is pointing to DISPLAY TYPE and then press the ‹/› Navigation Buttons D © to select, from among the options shown, one that is closest to the type of display being used. The selection will change the settings on the ADVANCED CONFIGURATION SUB-MENUS to the parameters best suited to that type of display. Of course, you may also change these settings yourself at any time, through the submenus. The list of input source defaults is: CRT: This setting is optimized for use with displays that use cathode ray tubes (CRTs) to display images. For the purposes of this setting, it does not matter whether the display is a single tube, directview CRT TV or a three-tube front or rear projector. The default aspect ratio is 4:3, but you may change that setting, if desired, on the second page of the Advanced Configuration submenus, as shown on page 27. REAR PROJECT: This setting is optimized for rear projectors, regardless of the imaging technology used. FRONT PROJECT: This setting is optimized for front projectors, regardless of the imaging technology used. PLASMA: This setting is optimized for plasma displays, regardless of whether they are true highdefinition or "ED" displays that are HD-compatible. DLP: This setting is optimized for use with projectors that use light engines with Texas Instruments' DLP® technology. For the purposes of this setting, it does not matter whether the display uses one or three chips, or whether the display is front or rear projection. LCD: This setting is optimized for use with displays that use liquid crystal display (LCD) technology. For the purposes of this setting, it does not matter whether the display is a direct-view LCD flat panel, or front or rear projector. The ENHANCE LEVEL setting adjusts the degree to which the enhancement circuits that adjust the high-frequency content of the signal are applied. This is similar to the "Sharpness" control on a traditional television. This setting acts on the vertical and horizontal as well as the luminance and chrominance signals to offer what will appear as enhanced depth in the picture as well as greater small object detail. In general, lower settings are applicable for digital displays and sources, while higher settings may be preferred for CRT-based displays and digital sources. If you wish to change the default setting to suit your specific display type, input sources and personal image preferences, when the VIDEO MAIN menu is on the screen, press the ¤ Navigation Button D© so that the on-screen cursor is pointing to ENHANCE LEVEL and then press the ‹/› Navigation Buttons D© to enter the setting that delivers the best image to your eyes on the scale of 0 to 100. After any changes to the ENHANCE LEVEL line have been made, press the ⁄/¤ Navigation Buttons D© so that the on-screen cursor is pointing to the PICT ADJUST line. At this SYSTEM CONFIGURATION 25
-
 1
1 -
2
-
3
-
4
-
5
-
6
-
7
-
8
-
9
-
10
-
11
-
12
-
13
-
14
-
15
-
16
-
17
-
18
-
19
-
 20
20 -
 21
21 -
 22
22 -
 23
23 -
 24
24 -
 25
25 -
 26
26 -
 27
27 -
 28
28 -
 29
29 -
 30
30 -
31
-
32
-
33
-
34
-
35
-
36
-
37
-
38
-
39
-
40
-
41
-
42
-
43
-
44
-
45
-
46
-
47
-
48
-
49
-
50
-
51
-
52
-
53
-
54
-
55
-
56
-
57
-
58
-
59
-
60
 |
 |
