Harman Kardon AVR 745 Owners Manual - Page 31
OK/Enter Button, Set Button, Button, Step 2., Navigation Buttons, Navigation Button
 |
View all Harman Kardon AVR 745 manuals
Add to My Manuals
Save this manual to your list of manuals |
Page 31 highlights
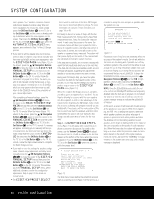
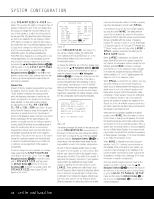
SYSTEM CONFIGURATION NOTE: While these tests detect whether a speaker is connected to a particular output, they cannot determine whether the speaker is in the correct position. (For example, it can tell whether a speaker is connected to the Surround Right output, but it cannot tell whether the speaker is on the right or left side of your listening room.) For that reason, we strongly recommend that you try to listen carefully to make sure that the test tone circulates in a clockwise rotation, starting with the front left speaker, to the center, to the front right, and so on to the subwoofer. If the tone is heard from a speaker that seems as though it is out of sequence, such as the tone coming from the surround left speaker when the next speaker in the sequence should be the surround right speaker, exit the EzSet/EQII system when the test sequence is completed and use the manual output level tone adjustment process, as outlined on page 37, to determine which, if any, speaker is incorrectly connected. When the Far Field tests are complete, a message screen will appear to indicate whether the procedure was successful or not. In most cases, there will not be any problems and you will see the message shown in Figure 15 on your screen. * DESIGN STEP 1 RESULTS* STEP 1 successful Detected speaker config FL : YES SBR: YES CEN : YES SBL: YES FR : YES SL : YES SR : YES → CONTINUE TO NEAR FIELD SKIP NEAR FIELD DESIGN BACK TO EZSET/EQ MAIN Figure 15 If the speaker positions shown match the actual speaker layout in your system, confirm that the cursor is pointing to CONTINUE TO NEAR FIELD and press the OK/Enter Button E on the TC 30 or the Set Button œ to take the Near Field measurements in Step 2. If the measurements are not successful, due to a missing or malfunctioning speaker, an ERROR message will appear as shown in Figure 16. EzSet/EQII is programmed to look for speaker pairs at the front left/ front right, surround left/surround right and surround back left/surround back right positions. If the test results indicate that one, but not both, of the speakers in any of these pairs is present, the menu will show NO next to the speaker position where the tests did not report back that a speaker is present. Should this message appear, make note of the suspect speaker location, exit the menus and turn the receiver off. Check all speaker wire connections and then rerun EzSet/EQII. * EQ DESIGN STEP 1 ERROR* Detected speaker config FL : YES SBR: YES CEN : YES SBL: YES FR : YES SL : YES SR : NO Verify spkr cons, mic Position. Raise vol 5dB. → REPEAT TEST BACK TO EZSET/EQ MAIN Figure 16 In some cases, the system may not function properly due to overly high output levels. When this occurs, you will see the message shown in Figure 17. EQ DESIGN OVERLOAD Overload found. Check microphone placement. Reduce volume by 6dB and run EZSET/EQ again. → CONTINUE Figure 17 If the EQ DESIGN OVERLOAD message appears, first press the OK/Enter Button E on the TC 30 or the Set Button œ on the ZR 10 remote. This will take you back to the EQ DESIGN SETP 1 ERROR menu. Make certain that the cursor is pointing to REPEAT TEST and press the OK/Enter Button E on the TC 30 or the Set Button œ on the ZR 10 remote again. At the EZSET DESIGN STEP 1 menu, lower the volume by at least 6dB and follow the steps described above to run the EzSet/EQII system again. Depending on the amount of the overload, you may need to repeat the process more than once to achieve satisfactory results. Step 2. When the Far Field measurements are completed, the next step is to take the Near Field measurements. These measurements enable EzSet/EQII to produce the most accurate settings for high-frequency equalization. The Near Field measurements are similar to the Far Field tests, except that the system will "listen" to only one speaker at a time, rather than sending the test signals to all speakers in rotation. * NEAR FIELD MENU * Please select a speaker: → 1-LEFT FRONT : NO 2-CENTER FRONT : NO 3-RIGHT FRONT : NO 4-LEFT SURR : NO 5-RIGHT SURR : NO 6-LEFT BACK SURR : --- 7-RIGHT BACK SURR: --- SKIP NEAR FIELD DESIGN BACK TO EZSET/EQ MAIN Figure 18 When it first appears, the NEAR FIELD MENU (Figure 18) will show a list of all the possible speakers and NO next to each speaker position where the Far Field measurements detected a speaker. The Near Field measurements should be made for each of those speakers to create a successful EQ Design. To select a speaker position for measurement, press the ⁄/¤ Navigation Buttons D© to move the cursor next to the desired speaker position and then press the OK/Enter Button E on the TC 30 or the Set Button œ on the ZR 10 remote. Before the test begins, an informational message will appear (Figure 19). EZSET DESIGN STEP 2 Put mic 2ft/0.6m from selected speaker, pointing at it, in a direct path between the listening position and the speaker. → CONTINUE BACK TO EZSET/EQ MAIN Figure 19 Follow the instructions and place the microphone about halfway between the speaker and the listening position where the microphone was placed during the Far Field measurements. With the cursor pointing to CONTINUE, press the OK/Enter Button E on the TC 30 or the Set Button œ on the ZR 10 remote control. When the WARNING message appears, press the › Navigation Button D© to start the test. A short tone will be heard from the speaker being tested, and after a short pause the on-screen menu will show a message to inform you of whether the test was successful or not. • If the test was successful and there are more speaker positions for which a Near Field measurement is required, press the OK/Enter Button E on the TC 30 or the Set Button œ on the ZR 10 remote to return to the NEAR FIELD MENU. Speaker positions where the Near Field measurement has been completed will show DONE to the right of the position name. Press the ⁄/¤ Navigation Buttons D© to select a position where NO still appears and repeat the steps shown above until a Near Field measurement has been taken at all speaker positions. • If the test was successful and all Near Field measurements have been completed, the on-screen message will direct you to the Subwoofer measurements. Make certain that the cursor is pointing to CONTINUE TO SUB DESIGN and press the OK/Enter Button E on the TC 30 or the Set Button œ on the ZR 10 remote (unless SYSTEM CONFIGURATION 31
-
 1
1 -
2
-
3
-
4
-
5
-
6
-
7
-
8
-
9
-
10
-
11
-
12
-
13
-
14
-
15
-
16
-
17
-
18
-
19
-
20
-
21
-
22
-
23
-
24
-
25
-
 26
26 -
 27
27 -
 28
28 -
 29
29 -
 30
30 -
 31
31 -
 32
32 -
 33
33 -
 34
34 -
 35
35 -
 36
36 -
37
-
38
-
39
-
40
-
41
-
42
-
43
-
44
-
45
-
46
-
47
-
48
-
49
-
50
-
51
-
52
-
53
-
54
-
55
-
56
-
57
-
58
-
59
-
60
 |
 |
