HP 1040 User Guide - Page 19
Overview of menu options, BASIC FAX menu - manual
 |
UPC - 884962546512
View all HP 1040 manuals
Add to My Manuals
Save this manual to your list of manuals |
Page 19 highlights
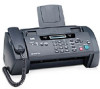
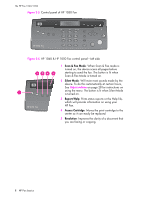
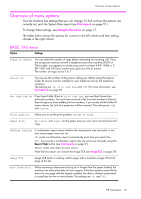
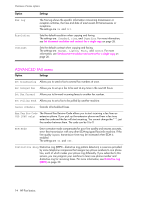
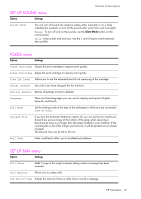
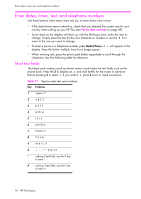
HP Fax basics HP Fax basics HP Fax basics HP Fax basics HP Fax basics HP Fax basics HP Fax basics Overview of menu options Overview of menu options Your fax machine has settings that you can change. To find out how the options are currently set, print the System Data report (see Print reports on page 51.) To change these settings, see Navigate the menus on page 17. The tables below shows the options for a menu in the left column and their setting choices in the right column. BASIC FAX menu Option Settings Rings To Answer You can select the number of rings before answering an incoming call. If you are using your machine as both a telephone and a fax machine (AUTO or TAM mode), we suggest you set the ring count to at least 4 (HP 1040) or 2 (HP 1050 with Toll Saver turned on) to give you time to answer. The number of rings can be 2 to 7. Caller ID You can see the number of the person calling you. Before using this feature, Caller ID service must be installed on your telephone line by the telephone company. The settings are On, On w/ Junk Fax, and Off. For more information, see Use Caller ID on page 28. Set Junk Fax No. If you have Caller ID set to On w/ Junk Fax, you can block faxes from particular numbers. You must have received a fax from that number to block it. Even though you have added junk fax numbers, if you turned off the Caller ID option above, the Junk Fax protection will be removed. The settings are Add and Delete. Print Quality Allows you to set the print quality to Normal or Draft. Paper Size A4, Letter and Legal are the paper sizes you can use to receive faxes and copy. Sending Confirm A confirmation report shows whether the transmission was successful or not, how many pages were sent, etc. ON: prints a confirmation report automatically each time you send a fax. OFF: never prints a confirmation report (You can print one manually using the Report/Help button (see Print reports on page 51). ERROR: prints only when an error occurs. Note that this report can include the Image TCR (see Image TCR on page 29). Image TCR Image TCR prints a sending confirm page with a miniature image of the first page of the fax. Auto Reduction When receiving a document as long as or longer than the paper loaded, the machine can reduce the data to fit your paper. If the fax machine cannot fit the data into one page with the feature enabled, the data is divided and printed in actual size on two or more sheets. The settings are On and Off. HP Fax basics 13
-
 1
1 -
2
-
3
-
4
-
5
-
6
-
7
-
8
-
9
-
10
-
11
-
12
-
13
-
 14
14 -
 15
15 -
 16
16 -
 17
17 -
 18
18 -
 19
19 -
 20
20 -
 21
21 -
 22
22 -
 23
23 -
 24
24 -
25
-
26
-
27
-
28
-
29
-
30
-
31
-
32
-
33
-
34
-
35
-
36
-
37
-
38
-
39
-
40
-
41
-
42
-
43
-
44
-
45
-
46
-
47
-
48
-
49
-
50
-
51
-
52
-
53
-
54
-
55
-
56
-
57
-
58
-
59
-
60
-
61
-
62
-
63
-
64
-
65
-
66
-
67
-
68
-
69
-
70
-
71
-
72
-
73
-
74
-
75
-
76
-
77
-
78
-
79
-
80
-
81
-
82
-
83
-
84
-
85
-
86
-
87
-
88
-
89
-
90
-
91
-
92
-
93
-
94
 |
 |