HP 1040 User Guide - Page 33
Additional features, Set rings to answer - fax machine instructions
 |
UPC - 884962546512
View all HP 1040 manuals
Add to My Manuals
Save this manual to your list of manuals |
Page 33 highlights
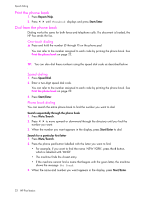
Additional features Additional features Additional features Set rings to answer 3 Additional features This chapter contains information on additional features you may want to set or change for your HP Fax. • Rings to answer: Sets the number of rings before the HP Fax answers the phone. • Caller ID: If you subscribe to Caller ID through your local phone company, you can use it with your HP Fax. • Block Junk Faxes: In conjunction with Caller ID, you can block certain numbers from sending you a fax. • Scan & Fax Mode: • Image TCR • Distinctive Ring • Answer/Receive mode: Determines how the HP Fax responds to incoming calls. 1 The "arrow buttons" located under the Menu button on the control panel are designated by !"in the instructions. 1 Set rings to answer You can select the number of rings that will occur before the fax answers an incoming call. If you are using your machine as both a telephone and a fax machine, we suggest you set the ring count to at least 4 to give you time to answer. TIP: HP 1050 Fax: The Toll Saver function for the Digital Message Center interacts with Rings to Answer. See Toll Saver on page 40. If you have the HP 1050 Fax and have Toll Saver turned on, set the RIngs to Answer to 2. 1. Press Menu repeatedly until BASIC FAX displays and press Start/Enter. Rings to Answer will display. 2. Press Start/Enter. 3. Enter the number of rings you want (2-7) and press Start/Enter. The HP Fax rings the set number of times and then answers. It then produces a different sounding ring to alert you to which type of call is incoming. • The additional ring may occur once for a fax call Additional features 27 Additional features Additional features Additional features Additional features
-
 1
1 -
2
-
3
-
4
-
5
-
6
-
7
-
8
-
9
-
10
-
11
-
12
-
13
-
14
-
15
-
16
-
17
-
18
-
19
-
20
-
21
-
22
-
23
-
24
-
25
-
26
-
27
-
 28
28 -
 29
29 -
 30
30 -
 31
31 -
 32
32 -
 33
33 -
 34
34 -
 35
35 -
 36
36 -
 37
37 -
 38
38 -
39
-
40
-
41
-
42
-
43
-
44
-
45
-
46
-
47
-
48
-
49
-
50
-
51
-
52
-
53
-
54
-
55
-
56
-
57
-
58
-
59
-
60
-
61
-
62
-
63
-
64
-
65
-
66
-
67
-
68
-
69
-
70
-
71
-
72
-
73
-
74
-
75
-
76
-
77
-
78
-
79
-
80
-
81
-
82
-
83
-
84
-
85
-
86
-
87
-
88
-
89
-
90
-
91
-
92
-
93
-
94
 |
 |