HP 1040 User Guide - Page 62
Print the self test, Replace the print cartridge, Start/Enter, Access Cartridge
 |
UPC - 884962546512
View all HP 1040 manuals
Add to My Manuals
Save this manual to your list of manuals |
Page 62 highlights
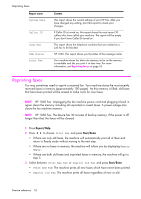
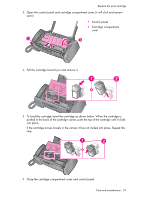
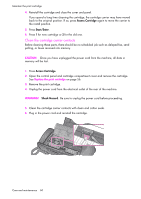
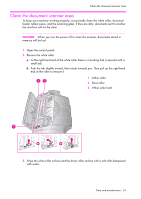
Print the self test NOTE: If the HP Fax is low on ink (ink level is 1/8), new faxes that come in will not be printed. They will be stored in memory. You must manually print the faxes from memory (see Reprinting faxes on page 52.) until you replace the ink cartridge (see Replace the print cartridge on page 56.). TIP: If memory become full before the print cartridge is replaced, the HP Fax will stop answering the phone. Be sure to print the faxes out of memory regularly if you do not immediately replace the ink cartridge. Print the self test When you want to test if the machine is working correctly, you can check it by printing the self test. 1. Press Menu repeatedly until TOOLS appears and press Start/Enter. 2. Scroll to Self Test by pressing !" and press Start/Enter. The machine runs self test and prints a report which shows the current status of the machine. Replace the print cartridge When you notice that the print becomes light or ink low or when install new ink cartridge appears in the display, replace the print cartridge. The part number for replacement cartridges is HP 20. 1. Take out a cartridge from its packaging and carefully remove the tape covering the printhead. Hold the cartridge by the colored top or black areas only. Do not touch the copper area. 2. Press the Access Cartridge button on the control panel. 1 Access Cartridge 1 The cartridge carrier moves to the install position. Care and maintenance 56
-
 1
1 -
2
-
3
-
4
-
5
-
6
-
7
-
8
-
9
-
10
-
11
-
12
-
13
-
14
-
15
-
16
-
17
-
18
-
19
-
20
-
21
-
22
-
23
-
24
-
25
-
26
-
27
-
28
-
29
-
30
-
31
-
32
-
33
-
34
-
35
-
36
-
37
-
38
-
39
-
40
-
41
-
42
-
43
-
44
-
45
-
46
-
47
-
48
-
49
-
50
-
51
-
52
-
53
-
54
-
55
-
56
-
 57
57 -
 58
58 -
 59
59 -
 60
60 -
 61
61 -
 62
62 -
 63
63 -
 64
64 -
 65
65 -
 66
66 -
 67
67 -
68
-
69
-
70
-
71
-
72
-
73
-
74
-
75
-
76
-
77
-
78
-
79
-
80
-
81
-
82
-
83
-
84
-
85
-
86
-
87
-
88
-
89
-
90
-
91
-
92
-
93
-
94
 |
 |