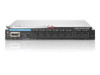
HP 6120XG HP ProCurve Series 6120 Blade Switches Installation and Getting Star - Page 16
Pre-Installation Planning, Hardware setup overview - blade switch firmware
 |
View all HP 6120XG manuals
Add to My Manuals
Save this manual to your list of manuals |
Page 16 highlights
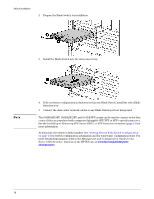
Pre-Installation Planning Note Pre-Installation Planning Before beginning installation complete the following tasks: ■ It is recommended the firmware revisions on all ProCurve Blade Switches are at the same revision level. Some versions of the firmware might not be compatible. ■ Determine which mezzanine cards, HBAs, and interconnect Switches are going to be used and where they will be installed in the enclosure. For installation and information on mapping server ports to interconnect bays, see the appropriate HP BladeSystem enclosure setup and installation guide on the HP Web site www.hp.com/go/bladesystem/documentation. ■ Determine which Ethernet networks will be connected to or contained within the enclosure. Most installations will have multiple Ethernet networks, each typically mapped to a specific IP subnet. Each physical NIC on a server blade can be connected to any one of these Ethernet networks. ■ Coordinate with data center personnel to ensure Ethernet network cable connections to the enclosure are installed or scheduled to be installed. ■ Set passwords. Identify the administrators for the environment and identify what roles and administrative privileges they will require. Hardware setup overview The following steps provide an overview of setting up the Blade Switch: 1. Install and set up the enclosure. See the appropriate HP BladeSystem enclosure setup and installation guide on the HP Web site www.hp.com/go/bladesystem/documentation. 2. Install the Blade Switch see ("Installing the Blade Switch into the enclosure" on page 9). 3. Note default network, user name, and password for the HP OA, which can be found on the tag that shipped with the HP OA. See the HP BladeSystem Onboard Administrator User Guide on the HP Web site www.hp.com/go/bladesystem/documentation. 4. Apply power to the enclosures. 5. Use the HP OA for basic setup of the enclosures (including enclosure name and passwords). See the HP BladeSystem Onboard Administrator User Guide. 6. Be sure the HP OA firmware is v2.60 or later. 7. Enclosure Bay IP Addressing is used to specify IP addresses for the interconnect Switches, which are then provided to the Switches by the OA. Be sure all ProCurve Blade Switch management interfaces and server blade iLO interfaces have IP addresses and valid gateway IP addresses using one of the following methods: • Run DHCP on the management network connected to the OA. • Configure the OA to set enclosure bay IP addresses. • Static manual IP. For proper management of enclosure devices there must be an Ethernet connection from the OA module to the external management network. For information on OA module cabling, see the HP BladeSystem Onboard Administrator User Guide. 8
-
 1
1 -
2
-
3
-
4
-
5
-
6
-
7
-
8
-
9
-
10
-
 11
11 -
 12
12 -
 13
13 -
 14
14 -
 15
15 -
 16
16 -
 17
17 -
 18
18 -
 19
19 -
 20
20 -
 21
21 -
22
-
23
-
24
-
25
-
26
-
27
-
28
-
29
-
30
-
31
-
32
-
33
-
34
-
35
-
36
-
37
-
38
-
39
-
40
-
41
-
42
-
43
-
44
-
45
-
46
-
47
-
48
-
49
-
50
-
51
-
52
-
53
-
54
-
55
-
56
-
57
-
58
-
59
-
60
-
61
-
62
 |
 |