HP 635n Practical IPsec Deployment for Printing and Imaging Devices - Page 108
Creating a Certificate Template - jetdirect firmware
 |
UPC - 882780301016
View all HP 635n manuals
Add to My Manuals
Save this manual to your list of manuals |
Page 108 highlights
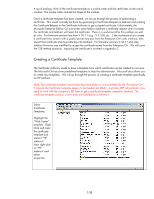
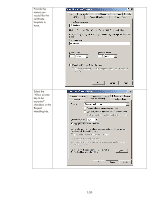
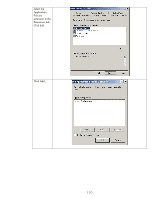
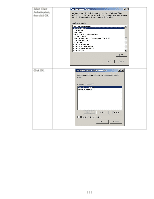
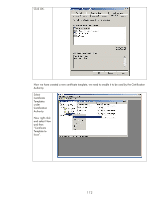
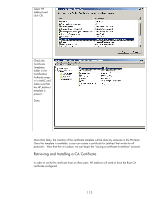
A quick analogy: think of the certificate template as a cookie cutter and the certificates as the actual cookies. The cookie cutter controls the shape of the cookies. Once a certificate template has been created, we can go through the process of generating a certificate. This would normally be done by generating a Certificate Request on Jetdirect and sending the Certificate Request to the Certificate Authority to get a signed certificate. Unfortunately, the Microsoft Enterprise Edition CA overwrites some fields in Jetdirect's certificate request when it creates the certificate and Jetdirect will reject the certificate. There is a workaround for this problem as well as a fix. For firmware versions less than V.36.11 (e.g., V.31.08, etc...), the workaround is to create a certificate from scratch with a public/private key pair from the Enterprise CA's web interface, then import that certificate and its private key into Jetdirect. For firmware versions V.36.11 and later, Jetdirect firmware was modified to accept the certificate issued from the Enterprise CA. We will cover the CSR method primarily. Importing the certificate is covered in Appendix C. Creating a Certificate Template The Certificate Authority needs to have a template from which certificates can be created for services. The Microsoft CA has some predefined templates to help the administrator. Microsoft also allows you to create new templates. We will go through the process of creating a certificate template specifically for HP Jetdirect. Note: The certificate template functionality described below is only available for the "Enterprise CA". It requires the Certificate Template snap-in to be loaded into MMC. A printer/MFP administrator may need to work with the company's PKI team to get a certificate template created for Jetdirect. The certificate template creation screen shots are included as a reference. Select Certificate Templates. Highlight the "Web Server" template. Right Click and copy the certificate template and name it "HP Jetdirect". Now right click on "HP Jetdirect" and select properties. 108
-
 1
1 -
2
-
3
-
4
-
5
-
6
-
7
-
8
-
9
-
10
-
11
-
12
-
13
-
14
-
15
-
16
-
17
-
18
-
19
-
20
-
21
-
22
-
23
-
24
-
25
-
26
-
27
-
28
-
29
-
30
-
31
-
32
-
33
-
34
-
35
-
36
-
37
-
38
-
39
-
40
-
41
-
42
-
43
-
44
-
45
-
46
-
47
-
48
-
49
-
50
-
51
-
52
-
53
-
54
-
55
-
56
-
57
-
58
-
59
-
60
-
61
-
62
-
63
-
64
-
65
-
66
-
67
-
68
-
69
-
70
-
71
-
72
-
73
-
74
-
75
-
76
-
77
-
78
-
79
-
80
-
81
-
82
-
83
-
84
-
85
-
86
-
87
-
88
-
89
-
90
-
91
-
92
-
93
-
94
-
95
-
96
-
97
-
98
-
99
-
100
-
101
-
102
-
 103
103 -
 104
104 -
 105
105 -
 106
106 -
 107
107 -
 108
108 -
 109
109 -
 110
110 -
 111
111 -
 112
112 -
 113
113 -
114
-
115
-
116
-
117
-
118
-
119
-
120
-
121
-
122
-
123
-
124
-
125
-
126
-
127
-
128
-
129
-
130
-
131
-
132
-
133
-
134
-
135
-
136
-
137
-
138
-
139
-
140
-
141
-
142
-
143
-
144
-
145
-
146
-
147
-
148
-
149
-
150
-
151
-
152
-
153
-
154
-
155
-
156
-
157
-
158
-
159
-
160
-
161
-
162
-
163
-
164
-
165
-
166
-
167
-
168
-
169
-
170
-
171
-
172
-
173
-
174
-
175
-
176
-
177
-
178
-
179
-
180
-
181
-
182
-
183
-
184
-
185
-
186
-
187
-
188
-
189
-
190
-
191
-
192
-
193
 |
 |
