HP 635n Practical IPsec Deployment for Printing and Imaging Devices - Page 51
HP Jetdirect IPsec Configuration Wizard: Pre-Shared Key Authentication
 |
UPC - 882780301016
View all HP 635n manuals
Add to My Manuals
Save this manual to your list of manuals |
Page 51 highlights
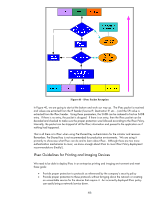
Specialty Servers Here we want to deploy an IPsec policy that Microsoft calls "Server-to-Server". For these specialty servers, IPsec policy becomes a bit more difficult to manage because we will want to protect all services to specific IP addresses. We may be tempted to simply protect specific ports and all IP addresses, but for some applications like Web Jetadmin, we would have a policy mismatch where Web Jetadmin would need to have IPsec configured on the device in order to configure IPsec! In order to avoid situations like these, applications such as Web Jetadmin, Digital Send Service, and other specialty services should use the "Server-to-Server" policy where specific IP addresses are entered. Essentially, once a device such as an MFP is ready for production use, we add its IP addressing information to the IPsec policy on the specialty server and protect all protocols and ports to and from that specific IP address. NOTE: This policy assumes that there are only a few specialty servers on the network. These specialty servers have to keep track of all the IP addresses of the HP Jetdirect products, so the more specialty servers there are, the more difficult the IPsec policy is to manage on these devices. Examples Let's walk through the actual screen shots needed to deploy IPsec Policy on a test network using these techniques. We will be using pre-shared key authentication, primarily because it is easy to explain and we are only on a test network. Moving to a production network would require moving to a different authentication method for security reasons. HP Jetdirect IPsec Configuration Wizard: Pre-Shared Key Authentication HP Recommend Printing and Imaging Policy for HP Jetdirect Although we are going to jump right into configuring IPsec, we are doing this step only because this is an IPsec whitepaper! If we were trying to deploy Jetdirect products securely, we would start by reading the "HP Jetdirect Security Guidelines" whitepaper. The "HP Jetdirect Security Guidelines" whitepaper shows the steps that need to happen before IPsec is deployed (e.g., setting passwords, disabling protocols, etc...). With that caveat in mind, let's go ahead and get started on configuring Jetdirect. First and foremost, we'll start by using https:// from your favorite browser. Then we'll click the "Networking" tab, and then the "IPsec/Firewall" link on the left navigation menu. 51
-
 1
1 -
2
-
3
-
4
-
5
-
6
-
7
-
8
-
9
-
10
-
11
-
12
-
13
-
14
-
15
-
16
-
17
-
18
-
19
-
20
-
21
-
22
-
23
-
24
-
25
-
26
-
27
-
28
-
29
-
30
-
31
-
32
-
33
-
34
-
35
-
36
-
37
-
38
-
39
-
40
-
41
-
42
-
43
-
44
-
45
-
 46
46 -
 47
47 -
 48
48 -
 49
49 -
 50
50 -
 51
51 -
 52
52 -
 53
53 -
 54
54 -
 55
55 -
 56
56 -
57
-
58
-
59
-
60
-
61
-
62
-
63
-
64
-
65
-
66
-
67
-
68
-
69
-
70
-
71
-
72
-
73
-
74
-
75
-
76
-
77
-
78
-
79
-
80
-
81
-
82
-
83
-
84
-
85
-
86
-
87
-
88
-
89
-
90
-
91
-
92
-
93
-
94
-
95
-
96
-
97
-
98
-
99
-
100
-
101
-
102
-
103
-
104
-
105
-
106
-
107
-
108
-
109
-
110
-
111
-
112
-
113
-
114
-
115
-
116
-
117
-
118
-
119
-
120
-
121
-
122
-
123
-
124
-
125
-
126
-
127
-
128
-
129
-
130
-
131
-
132
-
133
-
134
-
135
-
136
-
137
-
138
-
139
-
140
-
141
-
142
-
143
-
144
-
145
-
146
-
147
-
148
-
149
-
150
-
151
-
152
-
153
-
154
-
155
-
156
-
157
-
158
-
159
-
160
-
161
-
162
-
163
-
164
-
165
-
166
-
167
-
168
-
169
-
170
-
171
-
172
-
173
-
174
-
175
-
176
-
177
-
178
-
179
-
180
-
181
-
182
-
183
-
184
-
185
-
186
-
187
-
188
-
189
-
190
-
191
-
192
-
193
 |
 |
