HP 9040 HP LaserJet 9040mfp/9050mfp - Software Technical Reference (external) - Page 245
Detailed Windows installation, Using the Back and Cancel buttons
 |
UPC - 829160792927
View all HP 9040 manuals
Add to My Manuals
Save this manual to your list of manuals |
Page 245 highlights
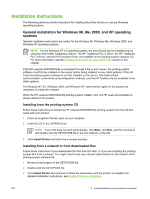
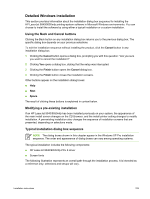
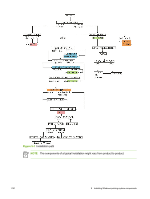
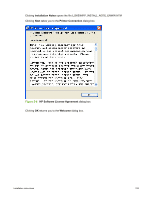
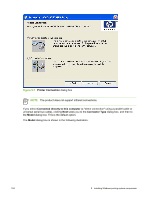
Detailed Windows installation This section provides information about the installation dialog box sequence for installing the HP LaserJet 9040/9050mfp printing-system software in Microsoft Windows environments. You can choose to install the software by using either a typical installation or a custom installation. Using the Back and Cancel buttons Clicking the Back button on any installation dialog box returns you to the previous dialog box. The specific dialog box depends on your previous selections. To exit the installation sequence without installing the product, click the Cancel button in any installation dialog box. 1 Clicking the Cancel button opens a dialog box, prompting you with this question: "Are you sure you want to cancel the installation?" 2 Clicking Yes opens a dialog box, stating that the setup was interrupted. 3 Clicking the Finish button opens the Cancel dialog box. 4 Clicking the Finish button closes the installation screens. Other buttons appear on the installation dialog boxes: ■ Help ■ Next ■ Space The result of clicking these buttons is explained in context below. Modifying a pre-existing installation If an HP LaserJet 9040/9050mfp has been installed previously on your system, the appearance of the main install screen changes on the CD Browser, and the install printer setting changes to modify installation. A pre-existing installation also changes the sequence of installation screens that are presented, depending on selections made. Typical Installation dialog box sequence NOTE The dialog boxes shown in this chapter appear in the Windows XP Pro installation sequence. The order and appearance of dialog boxes can vary among operating systems. The typical installation includes the following components: ■ HP LaserJet 9040/9050mfp PCL 6 driver ■ Screen fonts The following illustration represents an overall path through the installation process. It is intended as a reference only; selections and setups will vary. Installation instructions 229
-
 1
1 -
2
-
3
-
4
-
5
-
6
-
7
-
8
-
9
-
10
-
11
-
12
-
13
-
14
-
15
-
16
-
17
-
18
-
19
-
20
-
21
-
22
-
23
-
24
-
25
-
26
-
27
-
28
-
29
-
30
-
31
-
32
-
33
-
34
-
35
-
36
-
37
-
38
-
39
-
40
-
41
-
42
-
43
-
44
-
45
-
46
-
47
-
48
-
49
-
50
-
51
-
52
-
53
-
54
-
55
-
56
-
57
-
58
-
59
-
60
-
61
-
62
-
63
-
64
-
65
-
66
-
67
-
68
-
69
-
70
-
71
-
72
-
73
-
74
-
75
-
76
-
77
-
78
-
79
-
80
-
81
-
82
-
83
-
84
-
85
-
86
-
87
-
88
-
89
-
90
-
91
-
92
-
93
-
94
-
95
-
96
-
97
-
98
-
99
-
100
-
101
-
102
-
103
-
104
-
105
-
106
-
107
-
108
-
109
-
110
-
111
-
112
-
113
-
114
-
115
-
116
-
117
-
118
-
119
-
120
-
121
-
122
-
123
-
124
-
125
-
126
-
127
-
128
-
129
-
130
-
131
-
132
-
133
-
134
-
135
-
136
-
137
-
138
-
139
-
140
-
141
-
142
-
143
-
144
-
145
-
146
-
147
-
148
-
149
-
150
-
151
-
152
-
153
-
154
-
155
-
156
-
157
-
158
-
159
-
160
-
161
-
162
-
163
-
164
-
165
-
166
-
167
-
168
-
169
-
170
-
171
-
172
-
173
-
174
-
175
-
176
-
177
-
178
-
179
-
180
-
181
-
182
-
183
-
184
-
185
-
186
-
187
-
188
-
189
-
190
-
191
-
192
-
193
-
194
-
195
-
196
-
197
-
198
-
199
-
200
-
201
-
202
-
203
-
204
-
205
-
206
-
207
-
208
-
209
-
210
-
211
-
212
-
213
-
214
-
215
-
216
-
217
-
218
-
219
-
220
-
221
-
222
-
223
-
224
-
225
-
226
-
227
-
228
-
229
-
230
-
231
-
232
-
233
-
234
-
235
-
236
-
237
-
238
-
239
-
 240
240 -
 241
241 -
 242
242 -
 243
243 -
 244
244 -
 245
245 -
 246
246 -
 247
247 -
 248
248 -
 249
249 -
 250
250 -
251
-
252
-
253
-
254
-
255
-
256
-
257
-
258
-
259
-
260
-
261
-
262
-
263
-
264
-
265
-
266
-
267
-
268
-
269
-
270
-
271
-
272
-
273
-
274
-
275
-
276
-
277
-
278
-
279
-
280
-
281
-
282
-
283
-
284
-
285
-
286
-
287
-
288
-
289
-
290
-
291
-
292
-
293
-
294
-
295
-
296
-
297
-
298
-
299
-
300
-
301
-
302
-
303
-
304
-
305
-
306
-
307
-
308
-
309
-
310
-
311
-
312
-
313
-
314
-
315
-
316
-
317
-
318
-
319
-
320
-
321
-
322
-
323
-
324
-
325
-
326
-
327
-
328
-
329
-
330
 |
 |