HP 9050 HP LaserJet 9040mfp/9050mfp - Software Technical Reference (external) - Page 130
Save, Delete, or Rename, Rename, Custom Paper Size, Untitled
 |
UPC - 829160315386
View all HP 9050 manuals
Add to My Manuals
Save this manual to your list of manuals |
Page 130 highlights
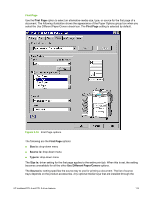
Save, Delete, or Rename The dynamic command button located under the Name drop-down menu has three possible labels: Save, Delete, and Rename. ■ Save is the button title whenever the height and width values have been changed since the most recent save action or since the selection of an existing custom media size. Clicking the button causes the name in the Name drop-down menu to be compared against each of the saved names. If a duplicate is found, a dialog box appears, asking if it is okay to replace the existing item. If you click Yes, the old item is updated with the new values. If you click No, the driver returns to the Custom Paper Size dialog box, where you can type a different name. The new name is compared only against the list of user-defined custom media names, and not against the standard media-size names. Whenever the command button has the Save title, it is the default button. ■ Delete is the button title whenever the name of an existing (previously saved) custom media size appears in the Name drop-down menu, such as immediately after selecting an item from the drop-down menu or clicking the Save button. Clicking the Delete button causes the saved custom media size to be deleted, after which the Name drop-down menu changes to Untitled, the height and width controls are unchanged, and the button title changes to Save. ■ Rename is the button title when you type something into the Name drop-down menu after selecting an existing custom media size from the drop-down menu. If no duplicate is found, then the name of the stored custom media size changes to match the contents of the Name dropdown menu. The following table illustrates the relationships between the Name drop-down menu, the command button, and the actions that take users from one state to another. Table 3-3 Name drop-down menu text strings State Drop-down menu contents 1 Untitled Button label Save 2 Save 3 Delete 4 Rename Action Next state Click Save. 3 Type something into the Name drop-down menu. 2 Change the width or height values. 1 Select a saved item from the drop-down menu. 3 Click Save. 3 Type something into the Name drop-down menu. 2 Change the width or height values. 2 Select a saved item from the drop-down menu. 3 Click Delete. 1 Type something into the Name drop-down menu. 4 Change the width or height values. 1 Select a saved item from the drop-down menu. 3 Click Rename (when the name is unique). 3 Click Rename (when the name is a duplicate). 4 Type something into the Name drop-down menu. 4 114 3 HP traditional print drivers for Windows
-
 1
1 -
2
-
3
-
4
-
5
-
6
-
7
-
8
-
9
-
10
-
11
-
12
-
13
-
14
-
15
-
16
-
17
-
18
-
19
-
20
-
21
-
22
-
23
-
24
-
25
-
26
-
27
-
28
-
29
-
30
-
31
-
32
-
33
-
34
-
35
-
36
-
37
-
38
-
39
-
40
-
41
-
42
-
43
-
44
-
45
-
46
-
47
-
48
-
49
-
50
-
51
-
52
-
53
-
54
-
55
-
56
-
57
-
58
-
59
-
60
-
61
-
62
-
63
-
64
-
65
-
66
-
67
-
68
-
69
-
70
-
71
-
72
-
73
-
74
-
75
-
76
-
77
-
78
-
79
-
80
-
81
-
82
-
83
-
84
-
85
-
86
-
87
-
88
-
89
-
90
-
91
-
92
-
93
-
94
-
95
-
96
-
97
-
98
-
99
-
100
-
101
-
102
-
103
-
104
-
105
-
106
-
107
-
108
-
109
-
110
-
111
-
112
-
113
-
114
-
115
-
116
-
117
-
118
-
119
-
120
-
121
-
122
-
123
-
124
-
 125
125 -
 126
126 -
 127
127 -
 128
128 -
 129
129 -
 130
130 -
 131
131 -
 132
132 -
 133
133 -
 134
134 -
 135
135 -
136
-
137
-
138
-
139
-
140
-
141
-
142
-
143
-
144
-
145
-
146
-
147
-
148
-
149
-
150
-
151
-
152
-
153
-
154
-
155
-
156
-
157
-
158
-
159
-
160
-
161
-
162
-
163
-
164
-
165
-
166
-
167
-
168
-
169
-
170
-
171
-
172
-
173
-
174
-
175
-
176
-
177
-
178
-
179
-
180
-
181
-
182
-
183
-
184
-
185
-
186
-
187
-
188
-
189
-
190
-
191
-
192
-
193
-
194
-
195
-
196
-
197
-
198
-
199
-
200
-
201
-
202
-
203
-
204
-
205
-
206
-
207
-
208
-
209
-
210
-
211
-
212
-
213
-
214
-
215
-
216
-
217
-
218
-
219
-
220
-
221
-
222
-
223
-
224
-
225
-
226
-
227
-
228
-
229
-
230
-
231
-
232
-
233
-
234
-
235
-
236
-
237
-
238
-
239
-
240
-
241
-
242
-
243
-
244
-
245
-
246
-
247
-
248
-
249
-
250
-
251
-
252
-
253
-
254
-
255
-
256
-
257
-
258
-
259
-
260
-
261
-
262
-
263
-
264
-
265
-
266
-
267
-
268
-
269
-
270
-
271
-
272
-
273
-
274
-
275
-
276
-
277
-
278
-
279
-
280
-
281
-
282
-
283
-
284
-
285
-
286
-
287
-
288
-
289
-
290
-
291
-
292
-
293
-
294
-
295
-
296
-
297
-
298
-
299
-
300
-
301
-
302
-
303
-
304
-
305
-
306
-
307
-
308
-
309
-
310
-
311
-
312
-
313
-
314
-
315
-
316
-
317
-
318
-
319
-
320
-
321
-
322
-
323
-
324
-
325
-
326
-
327
-
328
-
329
-
330
 |
 |
