HP 9050 HP LaserJet 9040mfp/9050mfp - Software Technical Reference (external) - Page 148
Copies, Orientation, Document preview image, About, About This Driver
 |
UPC - 829160315386
View all HP 9050 manuals
Add to My Manuals
Save this manual to your list of manuals |
Page 148 highlights
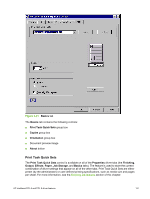
Copies Use the Copies option to specify the number of copies to print. The number of copies that you request appears in the Copies group box. You can select the number by typing in the box or by using the up and down arrows to the right of the text box. Valid entries are numbers from 1 to 9999 for the HP LaserJet 9040/9050mfp. The copies value will not advance from the maximum number (9999) to 1 when the up arrow is used, or change from 1 to the maximum number (9999) when the down arrow is used. When you click another group box or leave the Basics tab, invalid entries into the edit box (such as non-numerical input, numbers less than 1, or numbers greater than the maximum allowed) are changed to the last valid value that appeared in the box. The default number of copies is 1. Because you can set the number of copies that you want from some software programs, conflicts between the software program you are using and the driver can arise. In most cases, the software program and the driver communicate, so that the number of copies set in one location (such as the program) will appear in the other (such as the driver). For some programs, this communication does not take place, and the copies values are treated independently. For these programs, setting 10 copies in the program and then setting 10 copies in the driver will result in 100 copies (10 x 10) being printed. It is recommended that you set the number of copies in the program, wherever possible. Orientation Orientation refers to the layout of the image on the page, and does not affect the manner in which media is fed into the printer. You can specify the orientation of the print job. The three available orientations are portrait, landscape, and rotated. The default orientation is Portrait. NOTE Nearly all software programs establish the orientation for the printed page, so the page orientation in the driver is useful only for the few software programs that do not set an orientation. The Orientation group box contains three options: ■ Portrait. The top edge of the document is the shorter edge of the media. ■ Landscape. The top edge of the document is the longer edge of the media. ■ Rotate by 180 degrees. This creates a landscape or portrait orientation in which the image is rotated 180 degrees. This setting is useful for printing prepunched media. You can toggle orientation between portrait and landscape by clicking the document preview image. If you select the Rotate by 180 degrees check box, no change occurs in the document preview image. Document preview image The document preview image is a line-drawn image of a page that represents graphics and text. The document preview image appears in the upper-right corner of all of the Properties driver tabs (the Finishing, Output, Effects, Paper, Job Storage, and Basics tabs). For more information about the document preview image, see Finishing tab features. About When you click the About button on the Basics tab, or you click the HP logo on any of the driver Properties tabs, the About This Driver dialog box appears. To close the About box, click OK, 132 3 HP traditional print drivers for Windows
-
 1
1 -
2
-
3
-
4
-
5
-
6
-
7
-
8
-
9
-
10
-
11
-
12
-
13
-
14
-
15
-
16
-
17
-
18
-
19
-
20
-
21
-
22
-
23
-
24
-
25
-
26
-
27
-
28
-
29
-
30
-
31
-
32
-
33
-
34
-
35
-
36
-
37
-
38
-
39
-
40
-
41
-
42
-
43
-
44
-
45
-
46
-
47
-
48
-
49
-
50
-
51
-
52
-
53
-
54
-
55
-
56
-
57
-
58
-
59
-
60
-
61
-
62
-
63
-
64
-
65
-
66
-
67
-
68
-
69
-
70
-
71
-
72
-
73
-
74
-
75
-
76
-
77
-
78
-
79
-
80
-
81
-
82
-
83
-
84
-
85
-
86
-
87
-
88
-
89
-
90
-
91
-
92
-
93
-
94
-
95
-
96
-
97
-
98
-
99
-
100
-
101
-
102
-
103
-
104
-
105
-
106
-
107
-
108
-
109
-
110
-
111
-
112
-
113
-
114
-
115
-
116
-
117
-
118
-
119
-
120
-
121
-
122
-
123
-
124
-
125
-
126
-
127
-
128
-
129
-
130
-
131
-
132
-
133
-
134
-
135
-
136
-
137
-
138
-
139
-
140
-
141
-
142
-
 143
143 -
 144
144 -
 145
145 -
 146
146 -
 147
147 -
 148
148 -
 149
149 -
 150
150 -
 151
151 -
 152
152 -
 153
153 -
154
-
155
-
156
-
157
-
158
-
159
-
160
-
161
-
162
-
163
-
164
-
165
-
166
-
167
-
168
-
169
-
170
-
171
-
172
-
173
-
174
-
175
-
176
-
177
-
178
-
179
-
180
-
181
-
182
-
183
-
184
-
185
-
186
-
187
-
188
-
189
-
190
-
191
-
192
-
193
-
194
-
195
-
196
-
197
-
198
-
199
-
200
-
201
-
202
-
203
-
204
-
205
-
206
-
207
-
208
-
209
-
210
-
211
-
212
-
213
-
214
-
215
-
216
-
217
-
218
-
219
-
220
-
221
-
222
-
223
-
224
-
225
-
226
-
227
-
228
-
229
-
230
-
231
-
232
-
233
-
234
-
235
-
236
-
237
-
238
-
239
-
240
-
241
-
242
-
243
-
244
-
245
-
246
-
247
-
248
-
249
-
250
-
251
-
252
-
253
-
254
-
255
-
256
-
257
-
258
-
259
-
260
-
261
-
262
-
263
-
264
-
265
-
266
-
267
-
268
-
269
-
270
-
271
-
272
-
273
-
274
-
275
-
276
-
277
-
278
-
279
-
280
-
281
-
282
-
283
-
284
-
285
-
286
-
287
-
288
-
289
-
290
-
291
-
292
-
293
-
294
-
295
-
296
-
297
-
298
-
299
-
300
-
301
-
302
-
303
-
304
-
305
-
306
-
307
-
308
-
309
-
310
-
311
-
312
-
313
-
314
-
315
-
316
-
317
-
318
-
319
-
320
-
321
-
322
-
323
-
324
-
325
-
326
-
327
-
328
-
329
-
330
 |
 |
