HP 9050 HP LaserJet 9040mfp/9050mfp - Software Technical Reference (external) - Page 151
Configuring the trays, Con tab features, This Tray Contains/Size Forms
 |
UPC - 829160315386
View all HP 9050 manuals
Add to My Manuals
Save this manual to your list of manuals |
Page 151 highlights
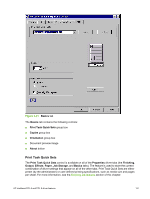
The NT Forms tab contains a single group box (the Form/Tray Assignments group box) which contains the following controls: ■ Available Trays is a drop-down menu that contains all the trays that are specified on the Configure tab. ■ This Tray Contains/Size (Forms) drop-down menu contains a list of standard media sizes that the HP LaserJet 9040/9050mfp supports, as well as any custom forms that are defined in the NT Forms tab. ■ This Tray Contains/Type drop-down menu lists all of the media types that the HP LaserJet 9040/9050mfp supports. ■ Clear All button removes all the size and type constraints on the Paper tab. Configuring the trays 1 Select the appropriate tray from the Available Trays drop-down menu. 2 Use the This Tray Contains/Size (Forms) drop-down menu to select the media size (or form) that is loaded in that tray. 3 Use the This Tray Contains/Type drop-down menu to select the media type that is configured for the tray. 4 Repeat steps 1 through 3 for the remaining trays. 5 Click OK to enable your settings, or, if necessary, click the Clear All button to reconfigure all of the trays and remove the size and type constraints that have been imposed on the Paper tab. Configure tab features NOTE The Configure tab is in the Properties for the print driver. To gain access to the Properties tabs, click Start on the Window task bar, click Settings, and then click Printers. Right-click the product name, and then click Properties. Use the Configure tab to tell the driver about the product hardware configuration. If bidirectional communication is enabled in a supported environment, set up this tab by clicking the Update Now button. If your environment does not support bidirectional communication, the Update Now button is unavailable, so you must manually configure the options on this tab. The Configure tab is available when the driver is opened from the Printers folder by clicking Properties. When you open the driver from within a program, the Configure tab is not visible (with a few exceptions, such as when using Excel 5.0 or Corel® Chart 4.0). When opened from the Printers folder, the Configure tab looks like the following illustration. HP traditional PCL 6 and PCL 5 driver features 135
-
 1
1 -
2
-
3
-
4
-
5
-
6
-
7
-
8
-
9
-
10
-
11
-
12
-
13
-
14
-
15
-
16
-
17
-
18
-
19
-
20
-
21
-
22
-
23
-
24
-
25
-
26
-
27
-
28
-
29
-
30
-
31
-
32
-
33
-
34
-
35
-
36
-
37
-
38
-
39
-
40
-
41
-
42
-
43
-
44
-
45
-
46
-
47
-
48
-
49
-
50
-
51
-
52
-
53
-
54
-
55
-
56
-
57
-
58
-
59
-
60
-
61
-
62
-
63
-
64
-
65
-
66
-
67
-
68
-
69
-
70
-
71
-
72
-
73
-
74
-
75
-
76
-
77
-
78
-
79
-
80
-
81
-
82
-
83
-
84
-
85
-
86
-
87
-
88
-
89
-
90
-
91
-
92
-
93
-
94
-
95
-
96
-
97
-
98
-
99
-
100
-
101
-
102
-
103
-
104
-
105
-
106
-
107
-
108
-
109
-
110
-
111
-
112
-
113
-
114
-
115
-
116
-
117
-
118
-
119
-
120
-
121
-
122
-
123
-
124
-
125
-
126
-
127
-
128
-
129
-
130
-
131
-
132
-
133
-
134
-
135
-
136
-
137
-
138
-
139
-
140
-
141
-
142
-
143
-
144
-
145
-
 146
146 -
 147
147 -
 148
148 -
 149
149 -
 150
150 -
 151
151 -
 152
152 -
 153
153 -
 154
154 -
 155
155 -
 156
156 -
157
-
158
-
159
-
160
-
161
-
162
-
163
-
164
-
165
-
166
-
167
-
168
-
169
-
170
-
171
-
172
-
173
-
174
-
175
-
176
-
177
-
178
-
179
-
180
-
181
-
182
-
183
-
184
-
185
-
186
-
187
-
188
-
189
-
190
-
191
-
192
-
193
-
194
-
195
-
196
-
197
-
198
-
199
-
200
-
201
-
202
-
203
-
204
-
205
-
206
-
207
-
208
-
209
-
210
-
211
-
212
-
213
-
214
-
215
-
216
-
217
-
218
-
219
-
220
-
221
-
222
-
223
-
224
-
225
-
226
-
227
-
228
-
229
-
230
-
231
-
232
-
233
-
234
-
235
-
236
-
237
-
238
-
239
-
240
-
241
-
242
-
243
-
244
-
245
-
246
-
247
-
248
-
249
-
250
-
251
-
252
-
253
-
254
-
255
-
256
-
257
-
258
-
259
-
260
-
261
-
262
-
263
-
264
-
265
-
266
-
267
-
268
-
269
-
270
-
271
-
272
-
273
-
274
-
275
-
276
-
277
-
278
-
279
-
280
-
281
-
282
-
283
-
284
-
285
-
286
-
287
-
288
-
289
-
290
-
291
-
292
-
293
-
294
-
295
-
296
-
297
-
298
-
299
-
300
-
301
-
302
-
303
-
304
-
305
-
306
-
307
-
308
-
309
-
310
-
311
-
312
-
313
-
314
-
315
-
316
-
317
-
318
-
319
-
320
-
321
-
322
-
323
-
324
-
325
-
326
-
327
-
328
-
329
-
330
 |
 |
