HP A310 User Guide - Page 10
Front view open, HP Photosmart A310 series - printer
 |
UPC - 882780739178
View all HP A310 manuals
Add to My Manuals
Save this manual to your list of manuals |
Page 10 highlights
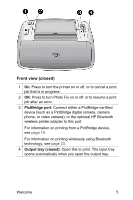
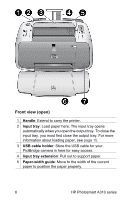
Front view (open) 1 Handle: Extend to carry the printer. 2 Input tray: Load paper here. The input tray opens automatically when you open the output tray. To close the input tray, you must first close the output tray. For more information about loading paper, see page 15. 3 USB cable holder: Store the USB cable for your PictBridge camera in here for easy access. 4 Input tray extension: Pull out to support paper. 5 Paper-width guide: Move to the width of the current paper to position the paper properly. 6 HP Photosmart A310 series
-
 1
1 -
2
-
3
-
4
-
 5
5 -
 6
6 -
 7
7 -
 8
8 -
 9
9 -
 10
10 -
 11
11 -
 12
12 -
 13
13 -
 14
14 -
 15
15 -
16
-
17
-
18
-
19
-
20
-
21
-
22
-
23
-
24
-
25
-
26
-
27
-
28
-
29
-
30
-
31
-
32
-
33
-
34
-
35
-
36
-
37
-
38
-
39
-
40
-
41
-
42
-
43
-
44
-
45
-
46
-
47
-
48
-
49
-
50
-
51
-
52
-
53
-
54
-
55
-
56
-
57
-
58
-
59
-
60
-
61
-
62
-
63
-
64
-
65
-
66
-
67
-
68
-
69
-
70
-
71
-
72
-
73
-
74
-
75
-
76
-
77
-
78
-
79
-
80
-
81
-
82
-
83
-
84
-
85
-
86
 |
 |

Front view (open)
1
Handle
: Extend to carry the printer.
2
Input tray
: Load paper here. The input tray opens
automatically when you open the output tray. To close the
input tray, you must first close the output tray. For more
information about loading paper, see
page 15
.
3
USB cable holder
: Store the USB cable for your
PictBridge camera in here for easy access.
4
Input tray extension
: Pull out to support paper.
5
Paper-width guide
: Move to the width of the current
paper to position the paper properly.
6
HP Photosmart A310 series