HP Armada 7300 Armada 7300 Family of Personal Computers Reference Guide - Page 95
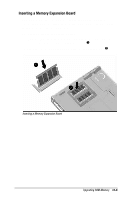
Installing a Memory Expansion Board
 |
View all HP Armada 7300 manuals
Add to My Manuals
Save this manual to your list of manuals |
Page 95 highlights
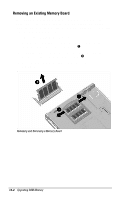
Installing a Memory Expansion Board If you have not replaced the original factory-installed screws in the memory compartment cover, you will need a Torx T-8 screwdriver to remove the screws. If you have replaced the original factory-installed screws in the memory compartment cover with the two security screws supplied with the computer, you must use the screwdriver supplied with the computer to remove and reinsert the screws. Removing the Memory Compartment Cover CAUTION: Electrostatic discharge (ESD) can damage electronic components. Before beginning this procedure, ensure that you are properly grounded. For more information, refer to Appendix C, "Electrostatic Discharge." To remove the memory compartment cover: 1. Save your work and shut down the computer. NOTE: If the computer is off and you are unsure whether it is in Hibernation, turn the computer on, then shut it down. 2. Disconnect all external devices connected to the computer. 3. Disconnect the power cord and remove the battery pack from the computer. ! WARNING: Failure to unplug the power cord and remove the battery pack before installing a memory expansion board can damage the equipment and expose you to the risk of electrical shock. 12-2 Upgrading RAM Memory
-
 1
1 -
2
-
3
-
4
-
5
-
6
-
7
-
8
-
9
-
10
-
11
-
12
-
13
-
14
-
15
-
16
-
17
-
18
-
19
-
20
-
21
-
22
-
23
-
24
-
25
-
26
-
27
-
28
-
29
-
30
-
31
-
32
-
33
-
34
-
35
-
36
-
37
-
38
-
39
-
40
-
41
-
42
-
43
-
44
-
45
-
46
-
47
-
48
-
49
-
50
-
51
-
52
-
53
-
54
-
55
-
56
-
57
-
58
-
59
-
60
-
61
-
62
-
63
-
64
-
65
-
66
-
67
-
68
-
69
-
70
-
71
-
72
-
73
-
74
-
75
-
76
-
77
-
78
-
79
-
80
-
81
-
82
-
83
-
84
-
85
-
86
-
87
-
88
-
89
-
 90
90 -
 91
91 -
 92
92 -
 93
93 -
 94
94 -
 95
95 -
 96
96 -
 97
97 -
 98
98 -
 99
99 -
 100
100 -
101
-
102
-
103
-
104
-
105
-
106
-
107
-
108
-
109
-
110
-
111
-
112
-
113
-
114
-
115
-
116
-
117
-
118
-
119
-
120
-
121
-
122
-
123
-
124
-
125
-
126
-
127
-
128
-
129
-
130
-
131
-
132
-
133
-
134
-
135
-
136
-
137
-
138
-
139
-
140
-
141
-
142
-
143
-
144
-
145
-
146
-
147
-
148
-
149
-
150
-
151
-
152
-
153
-
154
-
155
-
156
-
157
-
158
-
159
-
160
-
161
-
162
-
163
-
164
-
165
-
166
-
167
-
168
-
169
-
170
-
171
-
172
-
173
-
174
-
175
-
176
-
177
 |
 |
