HP Color Copier 190 HP Color Copier - (English) User Guide - Page 28
Clean the document-lid backing, Print a Self-Test Report, Work with print cartridges - ink cartridges
 |
View all HP Color Copier 190 manuals
Add to My Manuals
Save this manual to your list of manuals |
Page 28 highlights
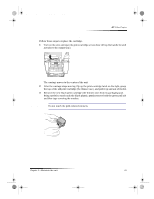
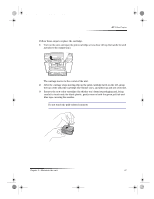
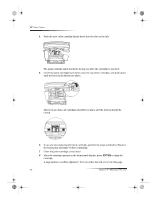
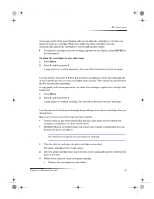
Cam.book Page 24 Friday, February 25, 2000 11:32 AM HP Color Copier Clean the document-lid backing Minor debris can also accumulate on the white document-backing located underneath the unit’s lid. Keep this backing clean so that it does not slow down performance or affect the accuracy of special features such as Fit to Page and Clone. 1 Turn off the unit, unplug the power cord, and raise the lid. 2 Clean the white document-backing with a soft cloth or sponge slightly moistened with a mild soap and warm water. 3 Wash the backing gently to loosen debris; do not scrub the backing. 4 Dry the backing with a chamois or soft cloth. CAUTION Do not use paper-based wipes as these may scratch the backing. 5 If this does not clean the backing well enough, repeat the previous steps using isopropyl (rubbing) alcohol, and wipe the backing thoroughly with a damp cloth to remove any residual alcohol. Print a Self-Test Report The Self-Test Report indicates whether the unit is operating properly. 1 Press Menu. 2 Press 2, and then press 2 again. The unit prints a report, which contains the following: • Product information: Have this information available if you need to call HP Customer Care for assistance. • Print-cartridge test patterns: The left patterns are for the black cartridge; the right patterns are for the color cartridge. If there are gaps in the lines, clean the print cartridges (for more information, see “Clean the print cartridges”). • Print-cartridge fill patterns: If any of the lines are not solid (that is, they contain gaps or streaks), one of the cartridges may be low on ink. Replace the appropriate cartridge, and perform another self-test. • Margin indicators: The lines on each side, the top, and the bottom of the page show the print margins. Work with print cartridges The print cartridges have microscopic nozzles that can clog when exposed to the air for more than a few minutes. The unit is designed to prevent nozzles from drying out when it is idle and when it is turned off using the ON button located on the front panel. A print cartridge that is not used for long periods of time can also clog, resulting in a noticeable decrease in print quality. To unclog the nozzles, clean the print cartridges. For more information, see “Clean the print cartridges.” 24 Chapter 5—Maintain the unit
-
 1
1 -
2
-
3
-
4
-
5
-
6
-
7
-
8
-
9
-
10
-
11
-
12
-
13
-
14
-
15
-
16
-
17
-
18
-
19
-
20
-
21
-
22
-
 23
23 -
 24
24 -
 25
25 -
 26
26 -
 27
27 -
 28
28 -
 29
29 -
 30
30 -
 31
31 -
 32
32 -
 33
33 -
34
-
35
-
36
-
37
-
38
-
39
-
40
-
41
-
42
-
43
-
44
-
45
-
46
-
47
-
48
-
49
-
50
-
51
-
52
-
53
-
54
 |
 |