HP Color LaserJet Managed MFP E77822-E77830 On-Site Installation Guide - Page 36
Staging checklists - series
 |
View all HP Color LaserJet Managed MFP E77822-E77830 manuals
Add to My Manuals
Save this manual to your list of manuals |
Page 36 highlights
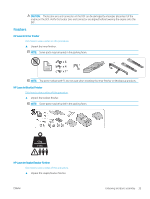
Staging checklists NOTE: Stagers must take appropriate training and download and utilize all installation guides in order to do the following steps correctly. Staging is typically performed at an off site location. NOTE: Assemblers must be trained and qualified/certified to perform this activity. Table 5-1 Staging (minimum 30 min + options) ❑ Unbox and inventory miscellaneous items - 2 or 4 person lift (10 mins). ❑ Unbox the tray or cabinet (5 mins). ❑ Unbox the engine (5 mins). ❑ Place the engine on the lower accessory, if ordered - 2 or 4 person lift (2 mins). ❑ Y1G24A must be used on the E72525, E72530, E72535 mono series when Stapler/Stacker Finisher or Booklet Finisher are used. ❑ Remove the shipping tape and scanner lock (5 mins). ❑ Unpackage and install the toner cartridge(s) (2 mins). Table 5-2 Assembly and testing (minimum 55 mins + options) ❑ Attach the paper handling or other accessories (based on configuration). ❑ Install the imaging unit(s) (5 mins). ❑ Adjust the tray paper guides to the appropriate size for the account. ❑ Load the paper trays and lock the rear guides (5 mins). ❑ Connect the power and LAN cables then turn on the main switch (1 min). ❑ Power on and wait for the initial screen (2 mins). ❑ Perform the Late Point Differentiation Configuration (LPDC) (3 min). NOTE: LPDC will be automatically set up after power on. If this fails or internet not available, the LPDC information will need to installed manually. ❑ Select a language and set the date/time (1 min). ❑ Update to latest firmware (up to 20 min). CAUTION: All accessories need to be attached before updating firmware. After installing any accessory the firmware must be updated to make sure the printer firmware is compatible with the accessory. ❑ Print the configuration and demo pages (2 min). ❑ Perform a basic functionality test (10 minutes) - test print, copy, and each accessory. ❑ Disassemble the accessories and prepare the printer for transportation (3 min). 30 Chapter 5 Staging ENWW
-
 1
1 -
2
-
3
-
4
-
5
-
6
-
7
-
8
-
9
-
10
-
11
-
12
-
13
-
14
-
15
-
16
-
17
-
18
-
19
-
20
-
21
-
22
-
23
-
24
-
25
-
26
-
27
-
28
-
29
-
30
-
 31
31 -
 32
32 -
 33
33 -
 34
34 -
 35
35 -
 36
36 -
 37
37 -
 38
38 -
 39
39 -
 40
40 -
 41
41 -
42
-
43
-
44
-
45
-
46
-
47
-
48
-
49
-
50
-
51
-
52
-
53
-
54
-
55
-
56
-
57
-
58
-
59
-
60
-
61
-
62
-
63
-
64
-
65
-
66
-
67
-
68
-
69
-
70
-
71
-
72
-
73
-
74
-
75
-
76
-
77
-
78
-
79
-
80
-
81
-
82
-
83
-
84
-
85
-
86
-
87
-
88
-
89
-
90
-
91
-
92
-
93
-
94
-
95
-
96
-
97
-
98
-
99
-
100
-
101
-
102
-
103
-
104
-
105
-
106
 |
 |
