HP Color LaserJet Managed MFP E77822-E77830 On-Site Installation Guide - Page 48
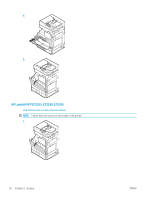
Install imaging drum (HP LaserJet MFP E72525, E72530
 |
View all HP Color LaserJet Managed MFP E77822-E77830 manuals
Add to My Manuals
Save this manual to your list of manuals |
Page 48 highlights
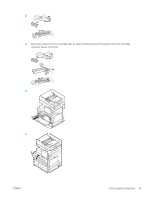
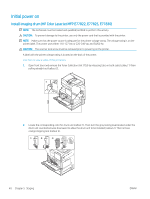
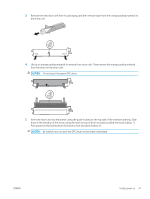
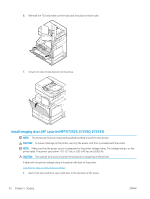
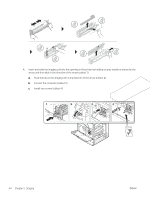
6. Reinstall the TCU and make sure the tabs lock into place on both sides. 7. Close front door in the direction of the arrow. Install imaging drum (HP LaserJet MFP E72525, E72530, E72535) NOTE: The technician must be trained and qualified/certified to perform this activity. CAUTION: To prevent damage to the printer, use only the power cord that is provided with the printer. NOTE: Make sure that the power source is adequate for the printer voltage rating. The voltage rating is on the printer label. The printer uses either 110-127 Vac or 220-240 Vac and 50/60 Hz. CAUTION: The scanner lock screw must be removed prior to powering on the printer. A label with the printer voltage rating is located on the back of the printer. Click here to view a video of this procedure. 1. Open front door and then open right door in the direction of the arrow. 42 Chapter 5 Staging ENWW
-
 1
1 -
2
-
3
-
4
-
5
-
6
-
7
-
8
-
9
-
10
-
11
-
12
-
13
-
14
-
15
-
16
-
17
-
18
-
19
-
20
-
21
-
22
-
23
-
24
-
25
-
26
-
27
-
28
-
29
-
30
-
31
-
32
-
33
-
34
-
35
-
36
-
37
-
38
-
39
-
40
-
41
-
42
-
 43
43 -
 44
44 -
 45
45 -
 46
46 -
 47
47 -
 48
48 -
 49
49 -
 50
50 -
 51
51 -
 52
52 -
 53
53 -
54
-
55
-
56
-
57
-
58
-
59
-
60
-
61
-
62
-
63
-
64
-
65
-
66
-
67
-
68
-
69
-
70
-
71
-
72
-
73
-
74
-
75
-
76
-
77
-
78
-
79
-
80
-
81
-
82
-
83
-
84
-
85
-
86
-
87
-
88
-
89
-
90
-
91
-
92
-
93
-
94
-
95
-
96
-
97
-
98
-
99
-
100
-
101
-
102
-
103
-
104
-
105
-
106
 |
 |
