HP Color LaserJet Managed MFP E77822-E77830 On-Site Installation Guide - Page 50
Connect the connector callout 3.
 |
View all HP Color LaserJet Managed MFP E77822-E77830 manuals
Add to My Manuals
Save this manual to your list of manuals |
Page 50 highlights
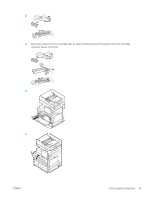
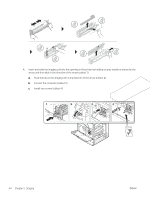
4. Insert and slide the imaging unit into the opening on the printer by holding on gray handle as shown by the arrow, and then slide in the direction of the arrow (callout 1). a. Push the tab on the imaging unit in the direction of the arrow (callout 2). b. Connect the connector (callout 3). c. Install two screws (callout 4). 1 2 3 4 44 Chapter 5 Staging ENWW
-
 1
1 -
2
-
3
-
4
-
5
-
6
-
7
-
8
-
9
-
10
-
11
-
12
-
13
-
14
-
15
-
16
-
17
-
18
-
19
-
20
-
21
-
22
-
23
-
24
-
25
-
26
-
27
-
28
-
29
-
30
-
31
-
32
-
33
-
34
-
35
-
36
-
37
-
38
-
39
-
40
-
41
-
42
-
43
-
44
-
 45
45 -
 46
46 -
 47
47 -
 48
48 -
 49
49 -
 50
50 -
 51
51 -
 52
52 -
 53
53 -
 54
54 -
 55
55 -
56
-
57
-
58
-
59
-
60
-
61
-
62
-
63
-
64
-
65
-
66
-
67
-
68
-
69
-
70
-
71
-
72
-
73
-
74
-
75
-
76
-
77
-
78
-
79
-
80
-
81
-
82
-
83
-
84
-
85
-
86
-
87
-
88
-
89
-
90
-
91
-
92
-
93
-
94
-
95
-
96
-
97
-
98
-
99
-
100
-
101
-
102
-
103
-
104
-
105
-
106
 |
 |

4.
Insert and slide the imaging unit into the opening on the printer by holding on gray handle as shown by the
arrow, and then slide in the direction of the arrow (callout 1).
a.
Push the tab on the imaging unit in the direction of the arrow (callout 2).
b.
Connect the connector (callout 3).
c.
Install two screws (callout 4).
1
2
3
4
44
Chapter 5
Staging
ENWW