HP Deskjet 6980 User Guide - Macintosh - Page 115
Photos do not print correctly
 |
UPC - 882780129580
View all HP Deskjet 6980 manuals
Add to My Manuals
Save this manual to your list of manuals |
Page 115 highlights
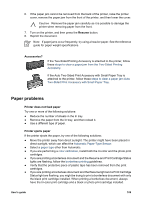
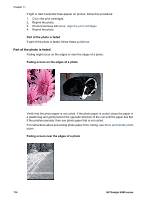
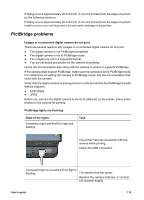
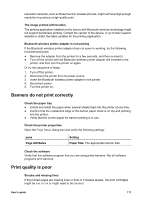
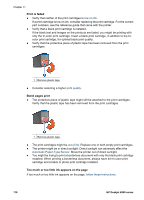
Note To easily identify the correct side of the cradle in which to install the print cartridge, match the symbol on the print cartridge with the symbol above the print cartridge cradle. Photos do not print correctly Reload the paper tray 1. Place the photo paper in the In tray with the side to be printed on facing down. Verify that the photo paper is flat. 2. Slide the paper forward until it stops. 3. Slide the paper guides firmly against the edge of the paper. Do not press the guide so firmly against the paper that the paper bends or curls. Check the printer settings 1. Open the Page Setup dialog box. 2. In the Page Attributes pane, verify the following settings: - Paper Size: The appropriate paper size - Orientation: The appropriate orientation 3. Open the Print dialog box. 4. In the Paper Type/Quality pane, verify the following settings: - Paper Type: The appropriate photo paper type - Quality: Best or Maximum dpi 5. Use the Real Life technologies for photo enhancement. Colors are tinted or incorrect If colors in photos appear tinted or incorrect, follow these steps: 1. Align the print cartridges. 2. Reprint the photo. 3. If colors are still tinted or incorrect, calibrate the color. Both a photo print cartridge and a tri-color print cartridge must be installed for color calibration. 4. Reprint the photo. 5. If colors continue to appear tinted or incorrect, open the Print dialog box, select the Paper Type/Quality pane, and then select Color Options. 6. Adjust the colors. Here are some guidelines to follow: - If the colors are too yellow, move the Color Tone slider toward Cooler. - If the colors are too blue, move the Color Tone slider toward Warmer. 7. Reprint the photo. Horizontal lines appear on a photo User's guide 113
-
 1
1 -
2
-
3
-
4
-
5
-
6
-
7
-
8
-
9
-
10
-
11
-
12
-
13
-
14
-
15
-
16
-
17
-
18
-
19
-
20
-
21
-
22
-
23
-
24
-
25
-
26
-
27
-
28
-
29
-
30
-
31
-
32
-
33
-
34
-
35
-
36
-
37
-
38
-
39
-
40
-
41
-
42
-
43
-
44
-
45
-
46
-
47
-
48
-
49
-
50
-
51
-
52
-
53
-
54
-
55
-
56
-
57
-
58
-
59
-
60
-
61
-
62
-
63
-
64
-
65
-
66
-
67
-
68
-
69
-
70
-
71
-
72
-
73
-
74
-
75
-
76
-
77
-
78
-
79
-
80
-
81
-
82
-
83
-
84
-
85
-
86
-
87
-
88
-
89
-
90
-
91
-
92
-
93
-
94
-
95
-
96
-
97
-
98
-
99
-
100
-
101
-
102
-
103
-
104
-
105
-
106
-
107
-
108
-
109
-
 110
110 -
 111
111 -
 112
112 -
 113
113 -
 114
114 -
 115
115 -
 116
116 -
 117
117 -
 118
118 -
 119
119 -
 120
120 -
121
-
122
-
123
-
124
-
125
-
126
-
127
-
128
-
129
-
130
-
131
-
132
-
133
-
134
-
135
-
136
-
137
-
138
-
139
-
140
-
141
-
142
-
143
-
144
-
145
-
146
-
147
-
148
-
149
-
150
-
151
-
152
-
153
-
154
 |
 |