HP Dl180 ProLiant DL180 Generation 5 Server Maintenance and Service Guide - Page 35
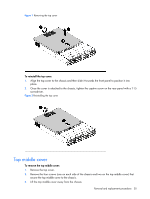
Optical media device bay, Remove the top middle cover.
 |
UPC - 883585990917
View all HP Dl180 manuals
Add to My Manuals
Save this manual to your list of manuals |
Page 35 highlights
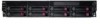
Figure 7 System Drive Bays/12 HDD model Optical media device bay The optical media device bay of servers with 8 HDD supports the installation of a 12.7mm DVD/CD R/RW ROM optical drive, and for the servers with 12 HDD the optical drive is optional, so the following process is for servers with 8 HDD. To remove the optical drive carrier: 1. Remove the top cover. 2. Remove the top middle cover. 3. Remove the screw that secures the optical drive carrier to the chassis. 4. Push the carrier toward the front of the unit. 5. Pull the carrier out of the chassis. Figure 8 Removing the optical drive carrier To remove the bezel blank from the optical drive carrier: Removal and replacement procedures 35
-
 1
1 -
2
-
3
-
4
-
5
-
6
-
7
-
8
-
9
-
10
-
11
-
12
-
13
-
14
-
15
-
16
-
17
-
18
-
19
-
20
-
21
-
22
-
23
-
24
-
25
-
26
-
27
-
28
-
29
-
 30
30 -
 31
31 -
 32
32 -
 33
33 -
 34
34 -
 35
35 -
 36
36 -
 37
37 -
 38
38 -
 39
39 -
 40
40 -
41
-
42
-
43
-
44
-
45
-
46
-
47
-
48
-
49
-
50
-
51
-
52
-
53
-
54
-
55
-
56
-
57
-
58
-
59
-
60
-
61
-
62
-
63
-
64
-
65
-
66
-
67
-
68
-
69
-
70
-
71
-
72
-
73
-
74
-
75
-
76
-
77
-
78
-
79
-
80
-
81
-
82
-
83
-
84
-
85
-
86
-
87
-
88
-
89
-
90
-
91
-
92
-
93
-
94
-
95
-
96
-
97
-
98
-
99
-
100
-
101
 |
 |

Removal and replacement procedures
35
Figure 7
System Drive Bays/12 HDD model
Optical media device bay
The optical media device bay of servers with 8 HDD supports the installation of a 12.7mm DVD/CD
R/RW ROM optical drive, and for the servers with 12 HDD the optical drive is optional, so the
following process is for servers with 8 HDD.
To remove the optical drive carrier:
1.
Remove the top cover.
2.
Remove the top middle cover.
3.
Remove the screw that secures the optical drive carrier to the chassis.
4.
Push the carrier toward the front of the unit.
5.
Pull the carrier out of the chassis.
Figure 8
Removing the optical drive carrier
To remove the bezel blank from the optical drive carrier: