HP Dl180 ProLiant DL180 Generation 5 Server Maintenance and Service Guide - Page 66
System Fan
 |
UPC - 883585990917
View all HP Dl180 manuals
Add to My Manuals
Save this manual to your list of manuals |
Page 66 highlights
Figure 59 Removing the power supply To replace the power supply: 1. Align the power supply cage connector with the open slot of power supply, and slide the power supply into the power supply bay until it snaps into place. Figure 60 Installing the power supply System Fan The server has four system fans located on the chassis center wall. The figure below identifies the system fans by their device number and shows their corresponding cable connections. Removal and replacement procedures 66
-
 1
1 -
2
-
3
-
4
-
5
-
6
-
7
-
8
-
9
-
10
-
11
-
12
-
13
-
14
-
15
-
16
-
17
-
18
-
19
-
20
-
21
-
22
-
23
-
24
-
25
-
26
-
27
-
28
-
29
-
30
-
31
-
32
-
33
-
34
-
35
-
36
-
37
-
38
-
39
-
40
-
41
-
42
-
43
-
44
-
45
-
46
-
47
-
48
-
49
-
50
-
51
-
52
-
53
-
54
-
55
-
56
-
57
-
58
-
59
-
60
-
 61
61 -
 62
62 -
 63
63 -
 64
64 -
 65
65 -
 66
66 -
 67
67 -
 68
68 -
 69
69 -
 70
70 -
 71
71 -
72
-
73
-
74
-
75
-
76
-
77
-
78
-
79
-
80
-
81
-
82
-
83
-
84
-
85
-
86
-
87
-
88
-
89
-
90
-
91
-
92
-
93
-
94
-
95
-
96
-
97
-
98
-
99
-
100
-
101
 |
 |

Removal and replacement procedures
66
Figure 59
Removing the power supply
To replace the power supply:
1.
Align the power supply cage connector with the open slot of power supply, and slide the power
supply into the power supply bay until it snaps into place.
Figure 60
Installing the power supply
System Fan
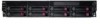
The server has four system fans located on the chassis center wall.
The figure below identifies the system fans by their device number and shows their corresponding
cable connections.