HP ENVY Photo 7800 User Guide - Page 14
Printer parts, Front view
 |
View all HP ENVY Photo 7800 manuals
Add to My Manuals
Save this manual to your list of manuals |
Page 14 highlights
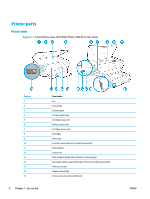
Printer parts Front view Figure 2-1 Front and top views of HP ENVY Photo 7800 All-in-One series Feature 1 2 3 4 5 6 7 8 9 10 11 12 13 14 15 16 17 8 Chapter 2 Get started Description Lid Lid-backing Scanner glass Printer model name Cartridge access door Memory device area Cartridge access area cartridges Photo tray On button (also referred to as the Power button) Control panel Output tray Color graphics display (also referred to as the display) Automatic output tray extender (also referred to as the tray extender) Memory card slot Memory device light Front universal serial bus (USB) port ENWW
-
 1
1 -
2
-
3
-
4
-
5
-
6
-
7
-
8
-
 9
9 -
 10
10 -
 11
11 -
 12
12 -
 13
13 -
 14
14 -
 15
15 -
 16
16 -
 17
17 -
 18
18 -
 19
19 -
20
-
21
-
22
-
23
-
24
-
25
-
26
-
27
-
28
-
29
-
30
-
31
-
32
-
33
-
34
-
35
-
36
-
37
-
38
-
39
-
40
-
41
-
42
-
43
-
44
-
45
-
46
-
47
-
48
-
49
-
50
-
51
-
52
-
53
-
54
-
55
-
56
-
57
-
58
-
59
-
60
-
61
-
62
-
63
-
64
-
65
-
66
-
67
-
68
-
69
-
70
-
71
-
72
-
73
-
74
-
75
-
76
-
77
-
78
-
79
-
80
-
81
-
82
-
83
-
84
-
85
-
86
-
87
-
88
-
89
-
90
-
91
-
92
-
93
-
94
-
95
-
96
-
97
-
98
-
99
-
100
-
101
-
102
-
103
-
104
-
105
-
106
-
107
-
108
-
109
-
110
-
111
-
112
-
113
-
114
-
115
-
116
-
117
-
118
-
119
-
120
-
121
-
122
-
123
-
124
-
125
-
126
-
127
-
128
-
129
-
130
-
131
-
132
-
133
-
134
-
135
-
136
-
137
-
138
-
139
-
140
-
141
-
142
-
143
-
144
-
145
-
146
-
147
-
148
-
149
-
150
-
151
-
152
-
153
-
154
-
155
-
156
-
157
-
158
-
159
-
160
-
161
-
162
-
163
-
164
-
165
-
166
-
167
-
168
-
169
-
170
-
171
-
172
-
173
-
174
-
175
-
176
-
177
-
178
-
179
-
180
-
181
-
182
-
183
-
184
-
185
-
186
-
187
-
188
-
189
-
190
-
191
-
192
-
193
-
194
-
195
-
196
-
197
-
198
-
199
-
200
-
201
-
202
-
203
 |
 |

Printer parts
Front view
Figure 2-1
Front and top views of HP ENVY Photo 7800 All-in-One series
Feature
Description
1
Lid
2
Lid-backing
3
Scanner glass
4
Printer model name
5
Cartridge access door
6
Memory device area
7
Cartridge access area
8
cartridges
9
Photo tray
10
On button (also referred to as the Power button)
11
Control panel
12
Output tray
13
Color graphics display (also referred to as the display)
14
Automatic output tray extender (also referred to as the tray extender)
15
Memory card slot
16
Memory device light
17
Front universal serial bus (USB) port
8
Chapter 2
Get started
ENWW