HP ENVY Photo 7800 User Guide - Page 148
Hardware and Sound, Purge Print Document
 |
View all HP ENVY Photo 7800 manuals
Add to My Manuals
Save this manual to your list of manuals |
Page 148 highlights
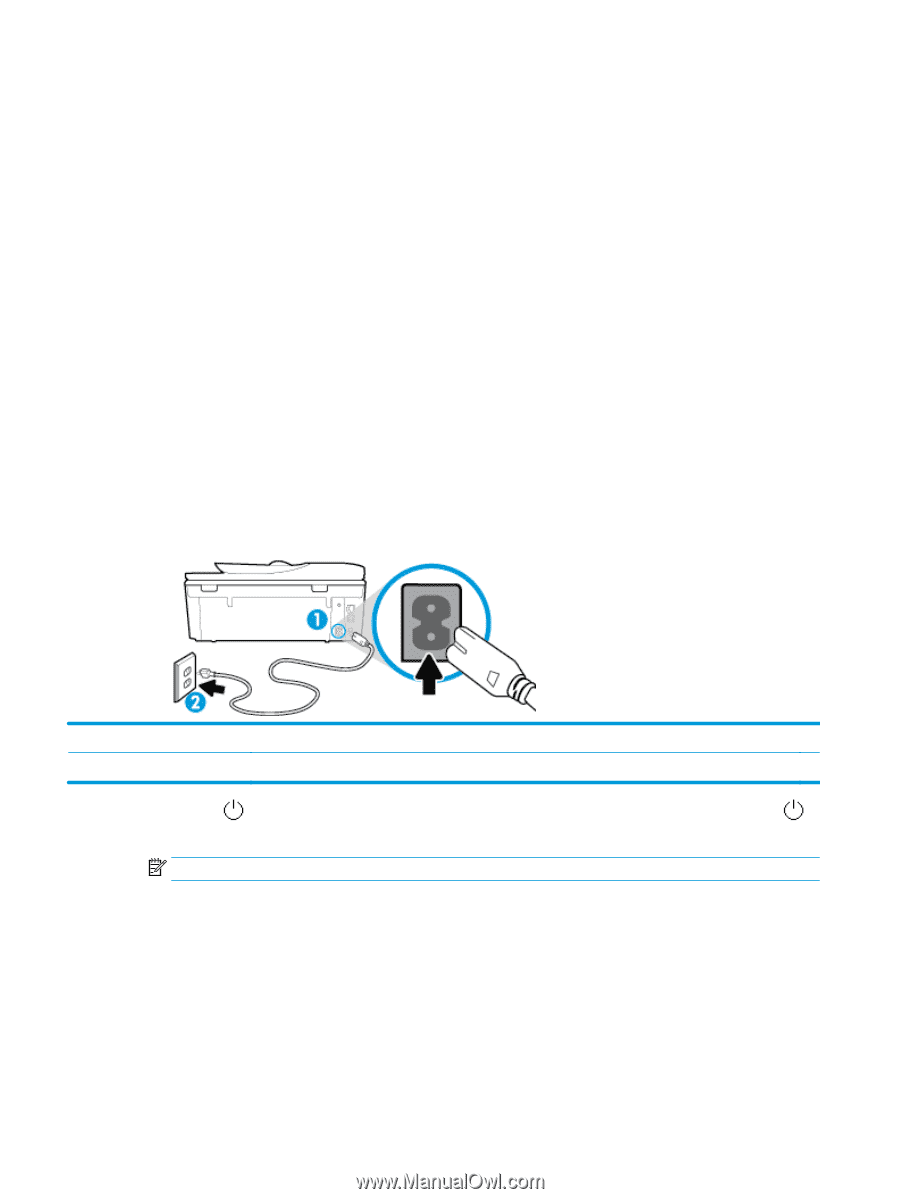
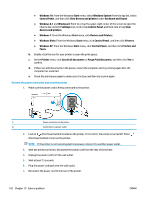
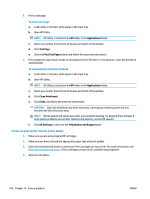
● Windows 10: From the Windows Start menu, select Windows System from the app list, select Control Panel, and then click View devices and printers under Hardware and Sound. ● Windows 8.1 and Windows 8: Point to or tap the upper-right corner of the screen to open the Charms bar, click the Settings icon, click or tap Control Panel, and then click or tap View devices and printers. ● Windows 7: From the Windows Start menu, click Devices and Printers. ● Windows Vista: From the Windows Start menu, click Control Panel, and then click Printers. ● Windows XP: From the Windows Start menu, click Control Panel, and then click Printers and Faxes. b. Double-click the icon for your printer to open the print queue. c. On the Printer menu, click Cancel all documents or Purge Print Document, and then click Yes to confirm. d. If there are still documents in the queue, restart the computer and try printing again after the computer has restarted. e. Check the print queue again to make sure it is clear, and then try to print again. To check the power connection and reset the printer 1. Make sure the power cord is firmly connected to the printer. 1 Power connection to the printer 2 Connection to a power outlet 2. Look at (the Power button) located on the printer. If it is not lit, the printer is turned off. Press (the Power button) to turn on the printer. NOTE: If the printer is not receiving electrical power, connect it to another power outlet. 3. With the printer turned on, disconnect the power cord from the rear of the printer. 4. Unplug the power cord from the wall outlet. 5. Wait at least 15 seconds. 6. Plug the power cord back into the wall outlet. 7. Reconnect the power cord to the rear of the printer. 142 Chapter 10 Solve a problem ENWW
-
 1
1 -
2
-
3
-
4
-
5
-
6
-
7
-
8
-
9
-
10
-
11
-
12
-
13
-
14
-
15
-
16
-
17
-
18
-
19
-
20
-
21
-
22
-
23
-
24
-
25
-
26
-
27
-
28
-
29
-
30
-
31
-
32
-
33
-
34
-
35
-
36
-
37
-
38
-
39
-
40
-
41
-
42
-
43
-
44
-
45
-
46
-
47
-
48
-
49
-
50
-
51
-
52
-
53
-
54
-
55
-
56
-
57
-
58
-
59
-
60
-
61
-
62
-
63
-
64
-
65
-
66
-
67
-
68
-
69
-
70
-
71
-
72
-
73
-
74
-
75
-
76
-
77
-
78
-
79
-
80
-
81
-
82
-
83
-
84
-
85
-
86
-
87
-
88
-
89
-
90
-
91
-
92
-
93
-
94
-
95
-
96
-
97
-
98
-
99
-
100
-
101
-
102
-
103
-
104
-
105
-
106
-
107
-
108
-
109
-
110
-
111
-
112
-
113
-
114
-
115
-
116
-
117
-
118
-
119
-
120
-
121
-
122
-
123
-
124
-
125
-
126
-
127
-
128
-
129
-
130
-
131
-
132
-
133
-
134
-
135
-
136
-
137
-
138
-
139
-
140
-
141
-
142
-
 143
143 -
 144
144 -
 145
145 -
 146
146 -
 147
147 -
 148
148 -
 149
149 -
 150
150 -
 151
151 -
 152
152 -
 153
153 -
154
-
155
-
156
-
157
-
158
-
159
-
160
-
161
-
162
-
163
-
164
-
165
-
166
-
167
-
168
-
169
-
170
-
171
-
172
-
173
-
174
-
175
-
176
-
177
-
178
-
179
-
180
-
181
-
182
-
183
-
184
-
185
-
186
-
187
-
188
-
189
-
190
-
191
-
192
-
193
-
194
-
195
-
196
-
197
-
198
-
199
-
200
-
201
-
202
-
203
 |
 |