HP Integrity Superdome 2 8/16 HP Smart Update Manager 5.3 User Guide - Page 20
Selecting the targets, Find Targets, Add Single Target
 |
View all HP Integrity Superdome 2 8/16 manuals
Add to My Manuals
Save this manual to your list of manuals |
Page 20 highlights
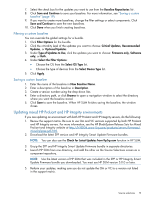
Selecting the targets The Select Targets screen automatically detects the local system running HP SUM and adds it to the targets list. To find new targets, click Find Targets or Add Single Target. For more information, see "Finding and discovering targets" (page 21) or "Adding a single target" (page 22). If you have an enclosure that has different target types that share credentials and need to be updated at the same time, create a group to manage them. For more information on creating and editing groups, see "Managing groups" (page 23). The table displays the following target information: • Check box-Targets with selected check boxes are updated. Click the check box to select or clear a target for update. • Target Name-This field displays the IP address of the target or group. • Status-This field displays a message indicating whether or not the target is ready to be updated. Enter the credentials for each target you are updating. For more information, see "Entering target credentials" (page 22). NOTE: The target status Ready means that HP SUM can detect the target, and is able to take inventory of the target. No analysis occurs until you click Next. • Last Updated-This field displays the last time the target was updated. If HP SUM can find the log from the last update, HP SUM shows a link to open a log file. • Associated Targets-This field displays the associated devices of the target. • Description-This field displays the description of the target. • Type-This field displays the type of target (for example, iLO or Onboard Administrator). NOTE: For HP SUM to discover a Broadcom NIC during an online update, you must bring the NIC up in Linux. From a command line, enter # ifup ethx or # ifconfig ethx up. 20 Using the HP SUM GUI
-
 1
1 -
2
-
3
-
4
-
5
-
6
-
7
-
8
-
9
-
10
-
11
-
12
-
13
-
14
-
 15
15 -
 16
16 -
 17
17 -
 18
18 -
 19
19 -
 20
20 -
 21
21 -
 22
22 -
 23
23 -
 24
24 -
 25
25 -
26
-
27
-
28
-
29
-
30
-
31
-
32
-
33
-
34
-
35
-
36
-
37
-
38
-
39
-
40
-
41
-
42
-
43
-
44
-
45
-
46
-
47
-
48
-
49
-
50
-
51
-
52
-
53
-
54
-
55
-
56
-
57
-
58
-
59
-
60
-
61
-
62
-
63
-
64
-
65
-
66
-
67
-
68
-
69
-
70
-
71
-
72
-
73
-
74
-
75
-
76
-
77
-
78
-
79
 |
 |
