HP LD4245tm Network Sign Manager User Guide - Page 35
Saving files in the USB device, Creating the HP Media Sign Player Schedule and Play List
 |
View all HP LD4245tm manuals
Add to My Manuals
Save this manual to your list of manuals |
Page 35 highlights
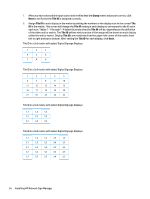
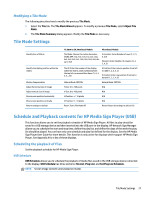
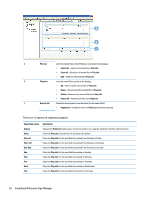
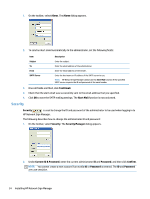
Repetition option Fri Sat Description Plays the Play List for the specified time period on Friday. Plays the Play List for the specified time period on Saturday. ● Apply-Saves the playback schedule and the Play List. ● Cancel-Deletes the current playback schedule set for the display. ● Option-Sets the playback schedule option ● Back-Moves back to the USB function selection view. Saving files in the USB device Before you schedule the playback of files, all media files to play on the display should be saved in the USB device separately. Use the Windows Explorer to save the media files to your USB device. The following describes how to save media files directly to the USB device: 1. Connect the USB device to the media player/computer. When the USB device appears in the My Computer window, double-click the USB device. 2. Copy the media file(s) to play to the USB root directory. NOTE: The media files should be saved to the USB root directory; otherwise, HP Network Sign Manager will not be able to load them. NOTE: HP Network Sign Manager supports the following media file formats-Image: jpg / Video: avi / Music: mp3. When playing media files on the USB device, you can use power on, power off, volume mute, volume control, and self diagnosis (LAMP, Power). NOTE: When HP Media Sign Player is active on the display, only certain control functions are active with HP Network Manager. The active controls are power on, power off, volume mute, volume control, and self diagnosis (LAMP, Power). Creating the HP Media Sign Player Schedule and Play List The following describes how to create the schedule and the Play List using the USB Schedule function: 1. The USB device with all the files to be played must be inserted into the display and the display must be powered on. 2. Select the display to which the USB device is connected in the Monitor Register Window pane, and then select the USB tab. The USB function selection view appears in the Control Panel. 3. Click the Create Play List and Schedule Online button. The USB Schedule view appears, and the files saved in the USB device are displayed in File List. NOTE: File List does not display the files with invalid formats which are not supported by HP Network Sign Manager, or the files not located in the USB root directory. Up to 31 characters are allowed for the file name. Up to 80 files are added to the file list. 4. Select the file(s) to schedule the playback, and then click Add. The files are now added to Play List. Use Select All and Clear All to easily select and deselect the files. 5. Change the playback order of the files in Play List using Up and Down. 6. Set the Play List schedule option. Schedule and Playback contents for HP Media Sign Player (USB) 29
-
 1
1 -
2
-
3
-
4
-
5
-
6
-
7
-
8
-
9
-
10
-
11
-
12
-
13
-
14
-
15
-
16
-
17
-
18
-
19
-
20
-
21
-
22
-
23
-
24
-
25
-
26
-
27
-
28
-
29
-
 30
30 -
 31
31 -
 32
32 -
 33
33 -
 34
34 -
 35
35 -
 36
36 -
 37
37 -
 38
38 -
 39
39 -
 40
40 -
41
 |
 |
