HP M4345 User Guide - Page 202
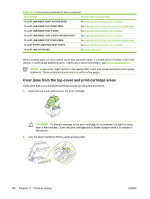
Clear jams from the top-cover and print-cartridge areas
 |
UPC - 882780548619
View all HP M4345 manuals
Add to My Manuals
Save this manual to your list of manuals |
Page 202 highlights
Table 11-2 Control-panel messages for jams (continued) Jam message Procedure for clearing the jam 13.JJ.NT JAM INSIDE RIGHT ACCESS DOOR See Clear jams from the tray2, 3, 4, or 5 areas. 13.JJ.NT JAM INSIDE TOP COVER AREA See Clear jams from the top-cover and print-cartridge areas. 13.JJ.NT JAM INSIDE TRAY 2 AREA See Clear jams from the tray2, 3, 4, or 5 areas. 13.JJ.NT JAM INSIDE TRAY 2 RIGHT ACCESS DOOR See Clear jams from the tray2, 3, 4, or 5 areas. 13.JJ.NT JAM INSIDE TOP COVER AREA See Clear jams from the top-cover and print-cartridge areas. 13.JJ.NT PAPER JAM OPEN INPUT TRAYS See Clear jams from the tray2, 3, 4, or 5 areas. 13.JJ.NT JAM IN STAPLER See Clear staple jams. When clearing jams, be very careful not to tear jammed media. If a small piece of media is left in the device, it could cause additional jams. If jams are a recurring problem, see Solve repeated jams. NOTE Loose toner might remain in the device after a jam and cause temporary print-quality problems. These problems should clear up within a few pages. Clear jams from the top-cover and print-cartridge areas Clear jams that occur during the printing process by using this procedure. 1. Open the top cover and remove the print cartridge. CAUTION To prevent damage to the print cartridge, do not expose it to light for more than a few minutes. Cover the print cartridge with a sheet of paper while it is outside of the device. 2. Use the green handle to lift the paper-access plate. 190 Chapter 11 Problem solving ENWW
-
 1
1 -
2
-
3
-
4
-
5
-
6
-
7
-
8
-
9
-
10
-
11
-
12
-
13
-
14
-
15
-
16
-
17
-
18
-
19
-
20
-
21
-
22
-
23
-
24
-
25
-
26
-
27
-
28
-
29
-
30
-
31
-
32
-
33
-
34
-
35
-
36
-
37
-
38
-
39
-
40
-
41
-
42
-
43
-
44
-
45
-
46
-
47
-
48
-
49
-
50
-
51
-
52
-
53
-
54
-
55
-
56
-
57
-
58
-
59
-
60
-
61
-
62
-
63
-
64
-
65
-
66
-
67
-
68
-
69
-
70
-
71
-
72
-
73
-
74
-
75
-
76
-
77
-
78
-
79
-
80
-
81
-
82
-
83
-
84
-
85
-
86
-
87
-
88
-
89
-
90
-
91
-
92
-
93
-
94
-
95
-
96
-
97
-
98
-
99
-
100
-
101
-
102
-
103
-
104
-
105
-
106
-
107
-
108
-
109
-
110
-
111
-
112
-
113
-
114
-
115
-
116
-
117
-
118
-
119
-
120
-
121
-
122
-
123
-
124
-
125
-
126
-
127
-
128
-
129
-
130
-
131
-
132
-
133
-
134
-
135
-
136
-
137
-
138
-
139
-
140
-
141
-
142
-
143
-
144
-
145
-
146
-
147
-
148
-
149
-
150
-
151
-
152
-
153
-
154
-
155
-
156
-
157
-
158
-
159
-
160
-
161
-
162
-
163
-
164
-
165
-
166
-
167
-
168
-
169
-
170
-
171
-
172
-
173
-
174
-
175
-
176
-
177
-
178
-
179
-
180
-
181
-
182
-
183
-
184
-
185
-
186
-
187
-
188
-
189
-
190
-
191
-
192
-
193
-
194
-
195
-
196
-
 197
197 -
 198
198 -
 199
199 -
 200
200 -
 201
201 -
 202
202 -
 203
203 -
 204
204 -
 205
205 -
 206
206 -
 207
207 -
208
-
209
-
210
-
211
-
212
-
213
-
214
-
215
-
216
-
217
-
218
-
219
-
220
-
221
-
222
-
223
-
224
-
225
-
226
-
227
-
228
-
229
-
230
-
231
-
232
-
233
-
234
-
235
-
236
-
237
-
238
-
239
-
240
-
241
-
242
-
243
-
244
-
245
-
246
-
247
-
248
-
249
-
250
-
251
-
252
-
253
-
254
-
255
-
256
-
257
-
258
-
259
-
260
-
261
-
262
-
263
-
264
-
265
-
266
-
267
-
268
-
269
-
270
-
271
-
272
-
273
-
274
-
275
-
276
-
277
-
278
-
279
-
280
-
281
-
282
-
283
-
284
-
285
-
286
-
287
-
288
-
289
-
290
-
291
-
292
-
293
-
294
-
295
-
296
 |
 |
