HP Media Center 886c HP Media Center PCs - (English) MEDIA CENTER SUPPLEMENT N - Page 24
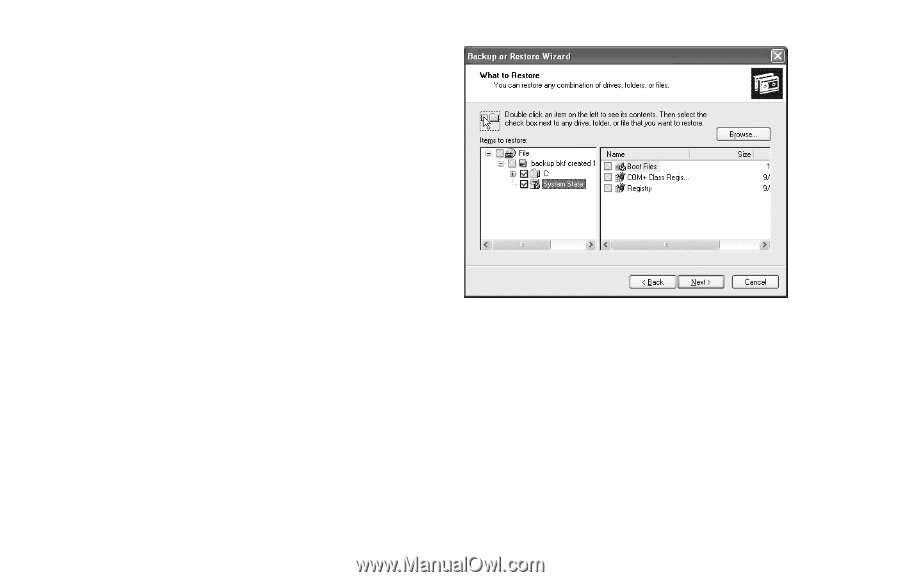
The Backup or Restore Wizard window shows
 |
View all HP Media Center 886c manuals
Add to My Manuals
Save this manual to your list of manuals |
Page 24 highlights
2 Double-click the backup file (for example Backup.bkf). The Backup or Restore Wizard opens. 3 Click Next. 4 Choose Restore files and settings, and then click Next. 5 The What to restore window opens. Click Browse, and the browse window shows the A drive. Click Browse again, and the window shows Select file to catalog. Click the drop-down menu arrow and click the optical drive with the backup CD. Click the backup file name. Click Open and then click OK. 6 In the Items to restore box, click the plus sign (+) for the backup file name. The file tree expands. Click the C box so a check mark appears. Click the System State box so a check mark appears. (The next figure shows the boxes checked.) 7 Click Next. 8 The Backup or Restore Wizard window shows the message You have created the following restore settings. In the window, click the Advanced button. Click Next. 9 A warning message window opens. Click OK in the Warning window. 20 Updated HP Media Center PC Information
-
 1
1 -
2
-
3
-
4
-
5
-
6
-
7
-
8
-
9
-
10
-
11
-
12
-
13
-
14
-
15
-
16
-
17
-
18
-
 19
19 -
 20
20 -
 21
21 -
 22
22 -
 23
23 -
 24
24 -
 25
25 -
 26
26 -
 27
27 -
 28
28 -
 29
29 -
30
-
31
-
32
-
33
-
34
-
35
-
36
-
37
-
38
-
39
-
40
-
41
-
42
-
43
-
44
-
45
-
46
-
47
-
48
 |
 |