HP Notebook 100 Armada 100S Series Reference Guide - Page 13
Booting with Windows 98, Click Apply, then OK. - drivers
 |
View all HP Notebook 100 manuals
Add to My Manuals
Save this manual to your list of manuals |
Page 13 highlights
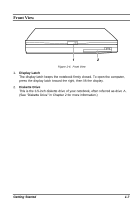
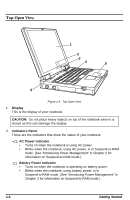
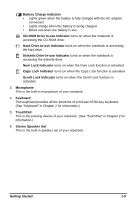
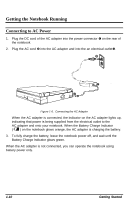
NOTE: To avoid viruses brought in by diskettes, boot the system from the hard disk instead of a diskette. If you must boot up from drive A, make sure the booting diskette is clean. Booting with Windows 98 The notebook comes to you with the operating system preinstalled. During the software installation process, you will be prompted to provide additional information. To complete the installation process when booting up with Windows 98 for the first time, follow these steps: 1. When prompted, enter your region, keyboard preference, name, and modem country/dialing information. 2. If you want to register your copy of the operating system now, connect the modem cable (included with integrated modem models) to the RJ11 jack on the notebook and plug the other end of the cable into a standard telephone wall jack. Then, click Next. If you do not want to register the operating system at this time click Skip. 3. Review and accept the Microsoft License Agreement, then enter the Product Key from the Certificate of Authenticity label. The label is located on the operating system manual or on the bottom side of the notebook. You will not be able to use the Windows software without entering the Product Key. 4. When prompted, choose the appropriate time zone and set the time and date. Click Apply, then OK. 5. The system will adjust the final configuration. Click Cancel in response to device installation dialogs, then allow the system to reboot, if prompted. The computer is now ready to use. Your notebook comes with a CD-ROM that contains software drivers you need to install, thus enabling the special features of your notebook. (See Chapter 6 for information on the drivers.) 1-12 Getting Started
-
 1
1 -
2
-
3
-
4
-
5
-
6
-
7
-
 8
8 -
 9
9 -
 10
10 -
 11
11 -
 12
12 -
 13
13 -
 14
14 -
 15
15 -
 16
16 -
 17
17 -
 18
18 -
19
-
20
-
21
-
22
-
23
-
24
-
25
-
26
-
27
-
28
-
29
-
30
-
31
-
32
-
33
-
34
-
35
-
36
-
37
-
38
-
39
-
40
-
41
-
42
-
43
-
44
-
45
-
46
-
47
-
48
-
49
-
50
-
51
-
52
-
53
-
54
-
55
-
56
-
57
-
58
-
59
-
60
-
61
-
62
-
63
-
64
-
65
 |
 |