HP Notebook 100 Armada 100S Series Reference Guide - Page 59
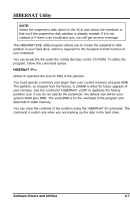
Installing the FIR Driver, From the Components menu, select COM port. Select FAST IR under Mode
 |
View all HP Notebook 100 manuals
Add to My Manuals
Save this manual to your list of manuals |
Page 59 highlights
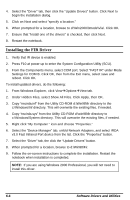
4. Select the "Driver" tab, then click the "Update Drivers" button. Click Next to begin the installation dialog. 5. Click on Next and select "specify a location." 6. When prompted for a location, browse to d:\Win2000\3mode\Via\. Click OK. 7. Ensure that "Install one of the drivers" is checked, then click Next. 8. Restart the notebook. Installing the FIR Driver 1. Verify that IR device is enabled. 2. Press F10 at power-up to enter the System Configuration Utility (SCU). 3. From the Components menu, select COM port. Select "FAST IR" under Mode Settings for COM B. Click OK, then from the Exit menu, select save and reboot. Click OK. To install updated drivers, do the following: 1. From Windows Explorer, click ViewàOptionsàView tab. 2. Under Hidden Files, select Show All Files. Click Apply, then OK. 3. Copy "nscirda.inf" from the Utility CD-ROM d:\Win98\fir directory to the c:\Windows\Inf directory. This will overwrite the existing files, if needed. 4. Copy "nscirda.sys" from the Utility CD-ROM d:\win98\fir directory to c:\Windows\System directory. This will overwrite the existing files, if needed. 5. Right click "My Computer " icon and choose "Properties." 6. Select the "Device Manager" tab, unfold Network Adapters, and select IRDA v3.0 Fast Infrared Port device from the list. Click the "Properties" button. 7. Select the "Driver" tab, the click the "Update Drivers" button. 8. When prompted for a location, browse to d:\Win98\Fir. 9. Follow the on-screen instructions to complete the installation. Restart the notebook when installation is completed. NOTE: If you are using Windows 2000 Professional, you will not need to install this driver. 6-6 Software Drivers and Utilities
-
 1
1 -
2
-
3
-
4
-
5
-
6
-
7
-
8
-
9
-
10
-
11
-
12
-
13
-
14
-
15
-
16
-
17
-
18
-
19
-
20
-
21
-
22
-
23
-
24
-
25
-
26
-
27
-
28
-
29
-
30
-
31
-
32
-
33
-
34
-
35
-
36
-
37
-
38
-
39
-
40
-
41
-
42
-
43
-
44
-
45
-
46
-
47
-
48
-
49
-
50
-
51
-
52
-
53
-
 54
54 -
 55
55 -
 56
56 -
 57
57 -
 58
58 -
 59
59 -
 60
60 -
 61
61 -
 62
62 -
 63
63 -
 64
64 -
65
 |
 |