HP Notebook 100 Armada 100S Series Reference Guide - Page 35
Internal Installation, Installing a PC Card - compaq
 |
View all HP Notebook 100 manuals
Add to My Manuals
Save this manual to your list of manuals |
Page 35 highlights
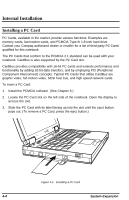
Internal Installation Installing a PC Card PC Cards, available in the market, provide various functions. Examples are memory cards, fax/modem cards, and PCMCIA Type III 1.8-inch hard drive. Contact your Compaq authorized dealer or reseller for a list of third party PC Cards qualified for this notebook. The PC Cards that conform to the PCMCIA 2.1 standard can be used with your notebook. CardBus is also supported by the PC Card slot. CardBus provides compatibility with 16-bit PC cards and extends performance and functionality by adding 32-bit data transfers, and by employing PCI (Peripheral Component Interconnect) concepts. Typical PC Cards that utilize CardBus are graphic video, full-motion video, SCSI host bus, and high speed network cards. To insert a PC Card: 1. Install the PCMCIA software. (See Chapter 6.) 2. Locate the PC Card slot on the left side of the notebook. Open the display to access the slot. 3. Slide the PC Card with its label facing up into the slot until the eject button pops out. (To remove a PC Card, press the eject button.) Figure 4-1. Installing a PC Card 4-4 System Expansion
-
 1
1 -
2
-
3
-
4
-
5
-
6
-
7
-
8
-
9
-
10
-
11
-
12
-
13
-
14
-
15
-
16
-
17
-
18
-
19
-
20
-
21
-
22
-
23
-
24
-
25
-
26
-
27
-
28
-
29
-
 30
30 -
 31
31 -
 32
32 -
 33
33 -
 34
34 -
 35
35 -
 36
36 -
 37
37 -
 38
38 -
 39
39 -
 40
40 -
41
-
42
-
43
-
44
-
45
-
46
-
47
-
48
-
49
-
50
-
51
-
52
-
53
-
54
-
55
-
56
-
57
-
58
-
59
-
60
-
61
-
62
-
63
-
64
-
65
 |
 |
