HP PSC 1400 User Guide - Page 34
Print a self-test report, Work with print cartridges, Replace the print cartridges - all in one printer software
 |
View all HP PSC 1400 manuals
Add to My Manuals
Save this manual to your list of manuals |
Page 34 highlights
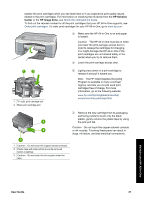
Chapter 8 Tip You can also print a self-test report to see if your print cartridges might need to be replaced. For more information, see Print a self-test report. To check the ink levels from the HP Solution Center (Windows) 1. In the HP Solution Center, click Settings, point to Print Settings, and then click Printer Toolbox. 2. Click the Estimated Ink Level tab. The estimated ink levels for the print cartridges appear. To check the ink levels from the HP Image Zone software (Mac) 1. In the HP Image Zone, choose Settings, and then choose Maintain Printer. 2. If the Select Printer dialog box appears, select your HP All-in-One, and then click Utilities. 3. From the pop-up menu, choose Ink Level. The estimated ink levels for the print cartridges appear. Print a self-test report If you are experiencing problems with printing, print a self-test report before you replace the print cartridges. 1. Load full-sized, unused plain white paper into the paper tray. 2. Press and hold the Cancel button and then press the Start Copy Color button. Maintain your HP All-in-One 3. Make sure the test patterns show a complete grid and that the thick colors lines are complete. - If more than a few lines in a pattern are broken, this might indicate a problem with the nozzles. You might need to clean the print cartridges. For more information, see Clean the print cartridges. - If the black line is missing, faded, streaked, or shows lines, this might indicate a problem with the black print cartridge in the right slot. - If any of the color lines are missing, faded, streaked, or show lines, this might indicate a problem with the tri-color print cartridge in the left slot. Streaks might indicate clogged nozzles or dirty contacts. You might need to clean the print cartridges. For more information, see Clean the print cartridges. Do not clean with alcohol. Note For examples of test patterns, lines of color, and color blocks from normal and malfunctioning print cartridges, see the onscreen HP Image Zone Help that came with your software. Work with print cartridges To ensure the best print quality from your HP All-in-One, you will need to perform some simple maintenance procedures. You might also need to check your print cartridges if the Check Print Cartridge light is on. Replace the print cartridges When the ink level for the print cartridge is low, replace the print cartridge. Make sure you have a replacement print cartridge available before removing the empty print cartridge. You should also 30 HP PSC 1400 All-in-One series
-
 1
1 -
2
-
3
-
4
-
5
-
6
-
7
-
8
-
9
-
10
-
11
-
12
-
13
-
14
-
15
-
16
-
17
-
18
-
19
-
20
-
21
-
22
-
23
-
24
-
25
-
26
-
27
-
28
-
 29
29 -
 30
30 -
 31
31 -
 32
32 -
 33
33 -
 34
34 -
 35
35 -
 36
36 -
 37
37 -
 38
38 -
 39
39 -
40
-
41
-
42
-
43
-
44
-
45
-
46
-
47
-
48
-
49
-
50
-
51
-
52
-
53
-
54
-
55
-
56
-
57
-
58
-
59
-
60
-
61
-
62
-
63
-
64
 |
 |
