HP PSC 1400 User Guide - Page 8
Control panel overview, Status light overview, On / Resume, Check Paper, Check Print Cartridge, Cancel - scan
 |
View all HP PSC 1400 manuals
Add to My Manuals
Save this manual to your list of manuals |
Page 8 highlights
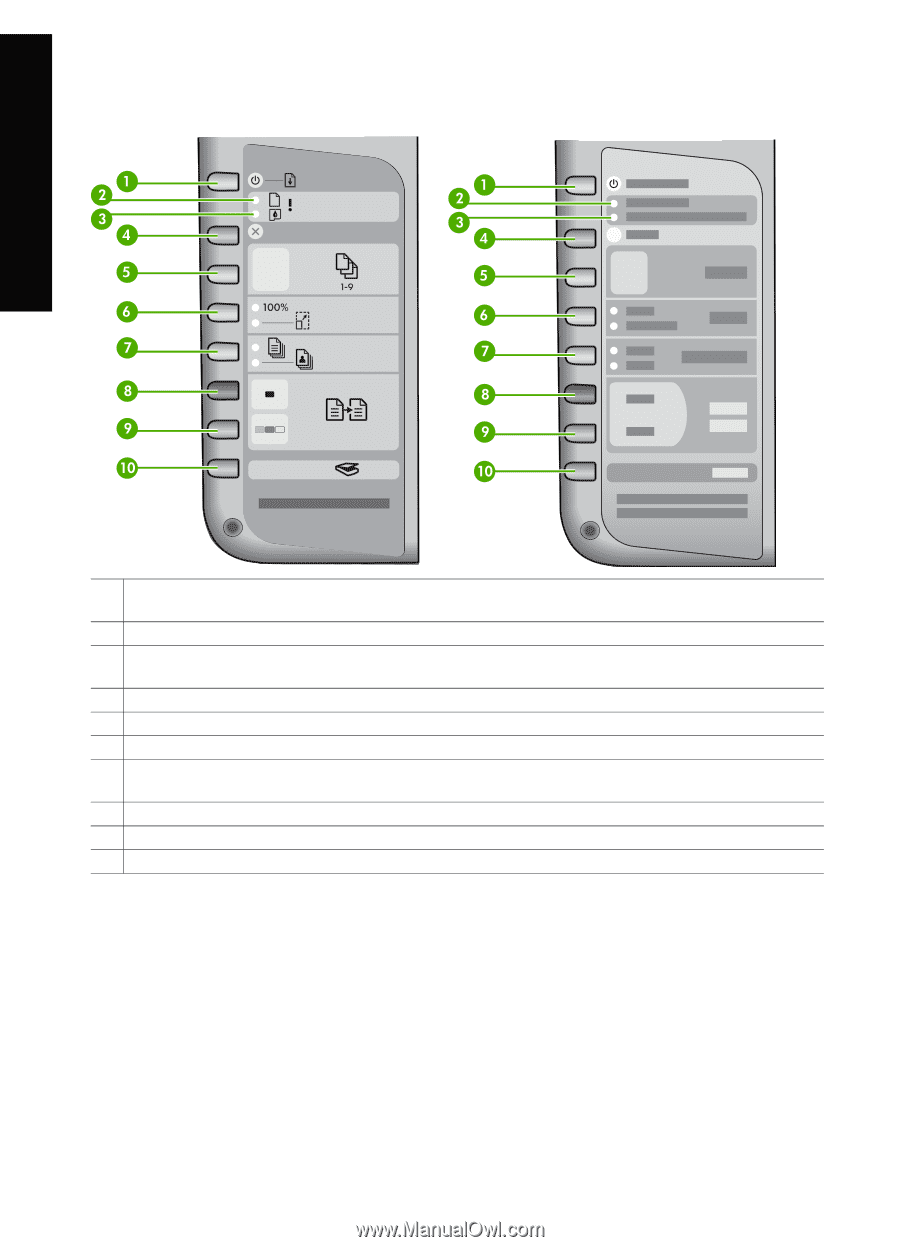
Chapter 1 Control panel overview HP All-in-One overview 1 On / Resume button: Turns the power on or off. In certain situations (for example, after clearing a paper jam), this button resumes printing. 2 Check Paper light: Indicates the need to load paper or remove a paper jam. 3 Check Print Cartridge light: Indicates the need to reinsert the print cartridge, replace the print cartridge, or close the print-carriage access door. 4 Cancel button: Stops a job, exit a menu, or exit settings. 5 Copies button: Specifies the desired number of copies. 6 Size button: Keeps the image size as it is (100%) or reduce or enlarge it to fit the size of the paper. 7 Paper Type button: Changes the paper type setting to match the type of paper loaded in the paper tray (plain or photo paper). The default setting is plain paper. 8 Start Copy Black button: Starts a black copy job. 9 Start Copy Color button: Starts a color copy job. 10 Scan button: Starts a scan job. Status light overview Several indicator lights inform you of the status of your HP All-in-One. The following table describes common situations and explains what the lights mean. For more information about status lights and resolving issues, see Troubleshooting information. The lights on the HP All-in-One flash in special sequences to inform you of various error conditions. Refer to the following table for information on solving your error condition based on which lights are on or blinking on your HP All-in-One. 4 HP PSC 1400 All-in-One series
-
 1
1 -
2
-
 3
3 -
 4
4 -
 5
5 -
 6
6 -
 7
7 -
 8
8 -
 9
9 -
 10
10 -
 11
11 -
 12
12 -
 13
13 -
14
-
15
-
16
-
17
-
18
-
19
-
20
-
21
-
22
-
23
-
24
-
25
-
26
-
27
-
28
-
29
-
30
-
31
-
32
-
33
-
34
-
35
-
36
-
37
-
38
-
39
-
40
-
41
-
42
-
43
-
44
-
45
-
46
-
47
-
48
-
49
-
50
-
51
-
52
-
53
-
54
-
55
-
56
-
57
-
58
-
59
-
60
-
61
-
62
-
63
-
64
 |
 |