HP PSC 1400 User Guide - Page 45
Operational troubleshooting, Print cartridge troubleshooting, HP Image Zone Help, HP Solution, Center - series paper jam
 |
View all HP PSC 1400 manuals
Add to My Manuals
Save this manual to your list of manuals |
Page 45 highlights
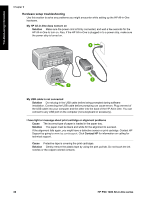
Troubleshooting information Operational troubleshooting The 1400 series Troubleshooting section in the HP Image Zone Help contains troubleshooting tips for some of the most common issues associated with your HP All-in-One. To access the troubleshooting information from a Windows computer, go to the HP Solution Center, click Help, and then choose Troubleshooting and Support. Troubleshooting is also available through the Help button that appears on some error messages. To access troubleshooting information from Mac OS X, click the HP Image Zone icon in the Dock, select Help from the menu bar, choose HP Image Zone Help from the Help menu, and then choose 1400 series Troubleshooting in the Help Viewer. Paper troubleshooting To help avoid paper jams, only use paper types that are recommended for your HP All-in-One. For a list of recommended papers, see the onscreen HP Image Zone Help, or go to www.hp.com/support. Do not load curled or wrinkled paper, or paper with bent or torn edges, into the paper tray. For more information, see Avoid paper jams. If paper does become jammed in your device, follow these instructions to clear the paper jam. 1. Press in the tab on the left side of the rear clean-out door and pull it toward you to remove it. Caution Trying to clear a paper jam from the front of the HP All-in-One can damage the print mechanism. Always clear paper jams through the rear clean-out door. 2. Gently pull the paper out of the rollers. Caution If the paper tears when you are removing it from the rollers, check the rollers and wheels for torn pieces of paper that might be remaining inside the device. If you do not remove all the pieces of paper from the HP All-in-One, more paper jams are likely to occur. 3. Replace the rear clean-out door. Gently push the door forward until it snaps into place. 4. Press On / Resume to continue the current job. Print cartridge troubleshooting If you are experiencing problems with printing, you might have a problem with one of the print cartridges. Try the following: 1. Remove and reinsert the print cartridges and verify that they are fully inserted and locked in place. 2. If the problem persists, print a self-test report to determine if there is a problem with the print cartridges. 3. If the self-test report shows a problem, clean the print cartridges. 4. If the problem persists, clean the copper-colored contacts of the print cartridges. User Guide 41
-
 1
1 -
2
-
3
-
4
-
5
-
6
-
7
-
8
-
9
-
10
-
11
-
12
-
13
-
14
-
15
-
16
-
17
-
18
-
19
-
20
-
21
-
22
-
23
-
24
-
25
-
26
-
27
-
28
-
29
-
30
-
31
-
32
-
33
-
34
-
35
-
36
-
37
-
38
-
39
-
 40
40 -
 41
41 -
 42
42 -
 43
43 -
 44
44 -
 45
45 -
 46
46 -
 47
47 -
 48
48 -
 49
49 -
 50
50 -
51
-
52
-
53
-
54
-
55
-
56
-
57
-
58
-
59
-
60
-
61
-
62
-
63
-
64
 |
 |
