HP Pavilion HDX9575LA HP Pavilion HDX Entertainment Notebook PC - Maintenance - Page 99
by pulling it away from the video board slot at an angle., until it rests at an angle.
 |
View all HP Pavilion HDX9575LA manuals
Add to My Manuals
Save this manual to your list of manuals |
Page 99 highlights
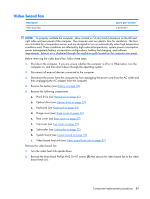
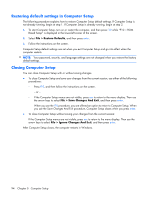
h. System board (see System board on page 76) i. Video board heat sink (see Video board heat sink on page 87) Remove the video board: 1. Remove the two Phillips PM2.5×4.0 screws (1) that secure the video board to the system board. 2. Lift the right side of the video board (2) until it rests at an angle. 3. Remove the video board (3) by pulling it away from the video board slot at an angle. NOTE: Video boards are designed with a notch (4) to prevent incorrect installation into the video board slot. Reverse this procedure to install the video board. Component replacement procedures 91
-
 1
1 -
2
-
3
-
4
-
5
-
6
-
7
-
8
-
9
-
10
-
11
-
12
-
13
-
14
-
15
-
16
-
17
-
18
-
19
-
20
-
21
-
22
-
23
-
24
-
25
-
26
-
27
-
28
-
29
-
30
-
31
-
32
-
33
-
34
-
35
-
36
-
37
-
38
-
39
-
40
-
41
-
42
-
43
-
44
-
45
-
46
-
47
-
48
-
49
-
50
-
51
-
52
-
53
-
54
-
55
-
56
-
57
-
58
-
59
-
60
-
61
-
62
-
63
-
64
-
65
-
66
-
67
-
68
-
69
-
70
-
71
-
72
-
73
-
74
-
75
-
76
-
77
-
78
-
79
-
80
-
81
-
82
-
83
-
84
-
85
-
86
-
87
-
88
-
89
-
90
-
91
-
92
-
93
-
 94
94 -
 95
95 -
 96
96 -
 97
97 -
 98
98 -
 99
99 -
 100
100 -
 101
101 -
 102
102 -
 103
103 -
 104
104 -
105
-
106
-
107
-
108
-
109
-
110
-
111
-
112
-
113
-
114
-
115
-
116
-
117
-
118
-
119
-
120
-
121
-
122
-
123
-
124
-
125
-
126
-
127
-
128
-
129
-
130
-
131
-
132
-
133
-
134
-
135
-
136
-
137
-
138
-
139
-
140
-
141
-
142
-
143
-
144
-
145
-
146
-
147
-
148
-
149
-
150
-
151
-
152
-
153
-
154
-
155
-
156
-
157
-
158
-
159
-
160
-
161
-
162
-
163
 |
 |

h
.
System board (see
System board
on page
76
)
i
.
Video board heat sink (see
Video board heat sink
on page
87
)
Remove the video board:
1
.
Remove the two Phillips PM2.5×4.0 screws
(1)
that secure the video board to the system board.
2
.
Lift the right side of the video board
(2)
until it rests at an angle.
3
.
Remove the video board
(3)
by pulling it away from the video board slot at an angle.
NOTE:
Video boards are designed with a notch
(4)
to prevent incorrect installation into the video
board slot.
Reverse this procedure to install the video board.
Component replacement procedures
91