HP Photosmart R930 User Guide - Page 6
Getting started, Camera top, side, and back, Picture Capture, Video Record, Playback, Shutter
 |
View all HP Photosmart R930 manuals
Add to My Manuals
Save this manual to your list of manuals |
Page 6 highlights
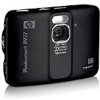
1 Getting started Use this section to get familiar with the camera controls, set up your digital camera for use, and begin taking pictures. Camera top, side, and back 34 5 6 1 2 11 7 8 10 9 1 Speaker. 2 button 3 Power light. 4 selector-Switches between Picture Capture, Video Record, and Playback (see "Taking pictures" on page 12, "Recording video clips" on page 12, and "Reviewing images and video clips" on page 24). 5 Shutter button. 6 Zoom lever-Accesses / Zoom (see "Using zoom" on page 14), Thumbnails (see "Viewing thumbnails" on page 26), and Magnify (see "Magnifying images" on page 26) functions. 7 USB connector. 8 Battery Charging light. 9 button-Turns the Touch Screen Image Display overlay on and off (see "Using the Touch Screen interface" on page 8). 10 Stylus (see "Using the Touch Screen interface" on page 8). 11 Touch Screen Image Display- Frames images when in Picture Capture or Video Record, reviews images when in Playback, and provides a Touch Screen interface for camera operations (see "Using the Touch Screen interface" on page 8). 4 Getting started
-
 1
1 -
 2
2 -
 3
3 -
 4
4 -
 5
5 -
 6
6 -
 7
7 -
 8
8 -
 9
9 -
 10
10 -
 11
11 -
 12
12 -
13
-
14
-
15
-
16
-
17
-
18
-
19
-
20
-
21
-
22
-
23
-
24
-
25
-
26
-
27
-
28
-
29
-
30
-
31
-
32
-
33
-
34
-
35
-
36
-
37
-
38
-
39
-
40
-
41
-
42
-
43
-
44
-
45
-
46
-
47
-
48
-
49
-
50
-
51
-
52
-
53
-
54
-
55
-
56
-
57
-
58
-
59
-
60
-
61
-
62
-
63
-
64
 |
 |
